Many often you may find yourself in a scenario where you need to switch or copy your website from one server to another – for testing purposes, changing your service provider or for a server upgrade.
Data loss and website downtime are the two major hurdles involved in website migrations. A successful migration plan should have a fool-proof way to tackle these complications.
The hectic migration tasks involved, the post-migration hiccups and the risks of data loss or downtime may often dissuade website owners or server owners from performing the move.
To migrate a WordPress site, there are certain plugins available, but they are not free. Here we’ll discuss a step-by-step process to migrate or copy your WordPress website from one server to another server without data loss.
[ Running a hosting business doesn’t have to be hard, or costly. Get world class Hosting Support Specialists at $9.99/hour (bulk discounts available) ]
1. Backup the website in the current server
The first and most important step before doing any migration is to ensure that there is latest backup of the website available. Backups helps to revert the website back to its working condition and minimize the downtime involved, in case something goes wrong.
To backup an existing WordPress website, download the website files and export the WordPress database, as they are relevant for retrieving the website. Exporting the database can be done using PhpMyAdmin utility:

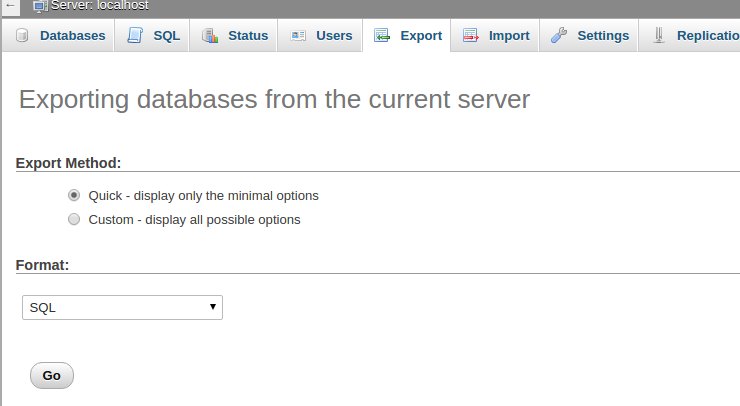
Export WordPress database to file
Browse the database in the PhpMyAdmin and click on the ‘Export’ tab to download the database. The backup will be downloaded in an SQL file format. Store the backup in a safe location outside the website account.
Save this new database SQL file for importing it to the website in the new server. Download the website files for copying over to the new server.
To download the website files, use FTP of File Manager. Make sure that the entire files in the WordPress folder are selected to copy over, including the hidden files such as ‘.htaccess’.
At Bobcares, we always stress on the importance of maintaining backups in external backup servers for business continuity purposes. We also use our custom scripts for routine backup and storage functions, to aid in the case of disasters.
2. Restore the website in the new server
Copy over the website files from old server to the new one using tools such as ‘rsync’ or FTP clients. Make sure that the website files are placed in the correct directory where it has to be accessed via the browser.
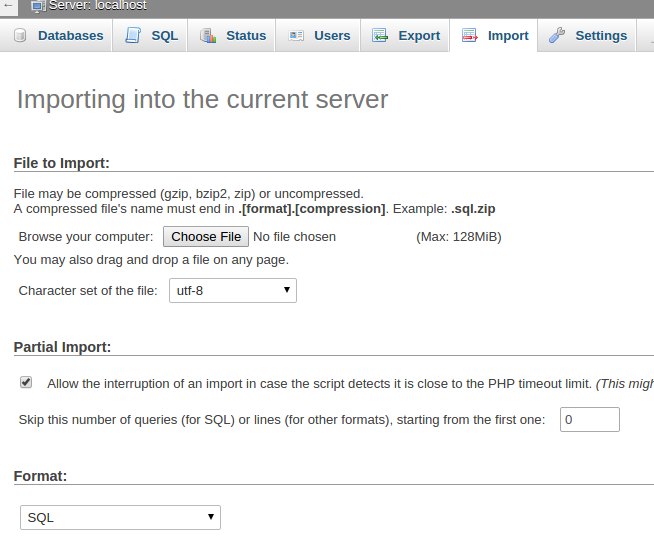
Update the ownership and permissions of the files correctly in the new server. Create the database in the new server and make sure that the DB user has access to it. Then, import the database SQL file using PhpMyAdmin in the new server.

Import WordPress database to new server
The site URL is stored in the WordPress database table “wp_options“. To test the site, this URL can be changed temporarily and verified before making the actual website live.
After confirming that all the links are loading fine, the site URL can be updated to the new URL and your WordPress site would load fine from the new server.
[ You don’t have to lose your sleep to keep your customers happy. Our Hosting Support Specialists cover your servers and support your customers 24/7 at just $9.99/hour. ]
3. Update the site URL
If database name and website name remain the same in the new server, migration is as easy as copying over these website files and database and restoring them.
But if there are domain and database changes involved, these details have to be updated in the database file and WordPress config file.
Go to the WordPress admin dashboard of the website to be copied. Update the website URL to the new domain name from the ‘Settings -> General’ section.

Update the WordPress URL
In the original database file that was exported, replace the URL for the website with the new domain name. If your old URL is
http://olddomain.comhttp://newdomain.comIn case of URL changes, once the new website starts resolving fine, make sure that you set a redirect from the old URL to the new one, to avoid loss of web traffic to the site.
[ Use your time to build your business. We’ll take care of your customers. Hire Our Hosting Support Specialists at $9.99/hr. ]
4. Edit wp-config.php
Update the WordPress config file with the new server’s MySQL database name, user and password and SiteURL, if there is a change in the new server.
Make sure that the user has been granted privileges to the database in the new server.
// ** MySQL settings - You can get this info from your web host ** //
/** The name of the database for WordPress */
define( 'DB_NAME', 'database_name_here' );

/** MySQL database username */
define( 'DB_USER', 'username_here' );

/** MySQL database password */
define( 'DB_PASSWORD', 'password_here' );

/** MySQL hostname */
define( 'DB_HOST', 'localhost' );
Points to note..
It is advisable to disable the plugins and permalinks in the WordPress site before migrating it and later enable them in the new server once the website is ready.
Updating the SQL files should be done with utmost caution and by experts, or else the file can get corrupted and the website can end up broken.
There are plugins such as Duplicator that can be used to copy and redeploy a WordPress site. However, huge websites with custom settings may require manual copy.
DNS updates should be done proactively to minimize the downtime involved for the website to resolve. Moving multi-site WordPress require a lot more manual updates in the DB.
If you’d like to know how to migrate your websites with minimal downtime and zero data loss, we’d be happy to talk to you.


This tutorial is great. Thanks for writing it.
Now I won’t have to bother the guys at Rosehosting for migrations and such.
Kudos to the one who wrote this. I’m very grateful.
Thanks Donald Miles, happy to know it was helpful for you 🙂