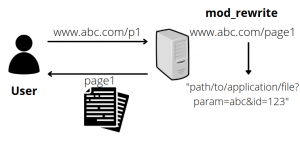
From this article, we will get to know How to enable mod_rewrite in apache ubuntu. At Bobcares we give you a detailed solution to your queries as part of our Server Management Services.
Let’s take a look at how our Support Team helped customers regarding enabling mod_rewrite.
Enable mod_rewrite in apache ubuntu
The apache Mod_rewrite is very popular for writing URLs on websites. This makes the URLs look clean and SEO-friendly on websites. It also lets you rewrite URLs based on conditions. A .htaccess file can create and apply rewrite rules without accessing server configuration files.

By default If the mod_Rewrite module is not enabled by the apache service. Consequently, you can use the below simpler steps to enable mod_rewrite in the apache server within minutes.
Step 1 – Installing Apache service
Initially need to activate mod_rewrite. The service have already installed. However, it will be disabled on a default Apache installation. So you can run the following command to configure apache web server:
sudo a2enmod rewrite
The a2enmod command enables the module and alerts accordingly that the module has enabled.
To put the changes into effect, restart the Apache service.
sudo systemctl restart apache2
mod_rewrite has fully enabled now.
Step 2 – Enabling mod_rewrite Apache
Now, we need to enable mod_rewrite apache in ubuntu. This helps to connect your instance or web server to SSH terminal.
sudo a2enmod rewrite
By this, it will activate the module or you will get an alert that the module is already in effect. Further to put these changes into effect, restart Apache.
sudo service apache2 restart
Step 3 – setting up .htaccess File for VirtualHost
After successfully enabling the Apache 2 rewrite module. We will now set up a .htaccess file for rewrite rule management. Then you have to add “AllowOverride All” in the VirtualHost configuration file.
A .htaccess file allows modifying rewrite rules without accessing the server configuration files. The main reason to allow .htaccess file in the Apache server is that it does not allow by default.
First, access your terminal and open the default Apache configuration file:
sudo nano /etc/apache2/sites-available/000-default.conf
Then you need to add “AllowOverride All” in your VirtualHost configuration, you will find the <VirtualHost *:80> block on line 1. Inside of that block, add the below code:
/etc/apache2/sites-available/default
<Directory /var/www/html>
Options Indexes FollowSymLinks MultiViews
AllowOverride All
Order allow,deny
allow from all
</Directory>
Your file will now match as the code given below:
/etc/apache2/sites-available/default
<VirtualHost *:80>
	<Directory /var/www/html>

		. . .

	</Directory>

	. . .
</VirtualHost>
Next, you need to restart the Apache service to set up all configurations in the running environment.
sudo service apache2 restart
sudo service apache2 restart
Further, create the .htaccess file:
sudo nano /var/www/html/.htaccess
Add the given first line at the top of the new file to enable the RewriteEngine mode and later save the file.
/var/www/html/.htaccess
RewriteEngine on
Finally, you can set permissions to users as read-only for .htaccess, to do this follow the command:
sudo chmod 644 /var/www/html/.htaccess
You have successfully enabled the mod_rewrite in the apache web server with an operational .htaccess file, to govern your web application routing rules
Conclusion
To conclude we learned How to enable mod_rewrite in apache ubuntu, mod_rewrite is used to ensure human-readable URLs, the .htaccess file itself has many uses and it should be noted that many other Apache modules may be added to extend its functionality.
PREVENT YOUR SERVER FROM CRASHING!
Never again
lose customers to poor server speed! Let us help you.
Our server experts will monitor & maintain your server
24/7 so that it remains lightning fast and secure.


0 Comments