Looking forward to installing WordPress? The instant method is to Install WordPress using Softaculous.
Softaculous software is an instant installer of applications. It automates setting up various management systems within a short spam of time.
It is very easy to install the WordPress via Softaculous software in the cPanel.
At Bobcares, we often get requests from our customers to install the WordPress via Softaculous installer as part of our Server Management Services.
Today, let’s get into the details on how our Support Engineers helps to install the WordPress via Softaculous software.
How we add Softaculous in cPanel
The softaculous software is a plugin which is installed via WHM. It is one of the most popular instant application installer.
After logged in to the WHM, we can install it in the server from the Manage Plugin option.
WHM > Manage plugin > Softaculous > Instant Installs
Here, we enabled softaculous and can be used by our cPanel clients. Let us discuss how our Support Engineers install WordPress using Softaculous.
How to install WordPress using Softaculous
At Bobcares, where we have more than a decade of expertise in managing servers, we see many customers face issue while installing WordPress.
Now, let’s see how our Support Engineers help the customers to install the WordPress via Softaculous installer.
Recently one of the customer approached us for easy installation of the WordPress. We then ask them for the cPanel logins and further details for installation.
After getting the logins, we proceed with the installation.
1. Initially, we logged in to cPanel.
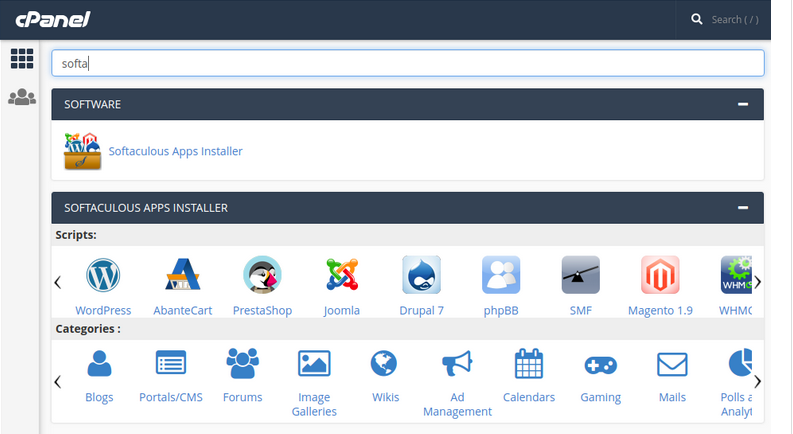
2. After that, we navigate to Softaculous Apps Installer menu
For instance, Softaculous Apps Installer appear as follows in the cPanel.

3. Then search for the WordPress icon from the list, and we selected it.
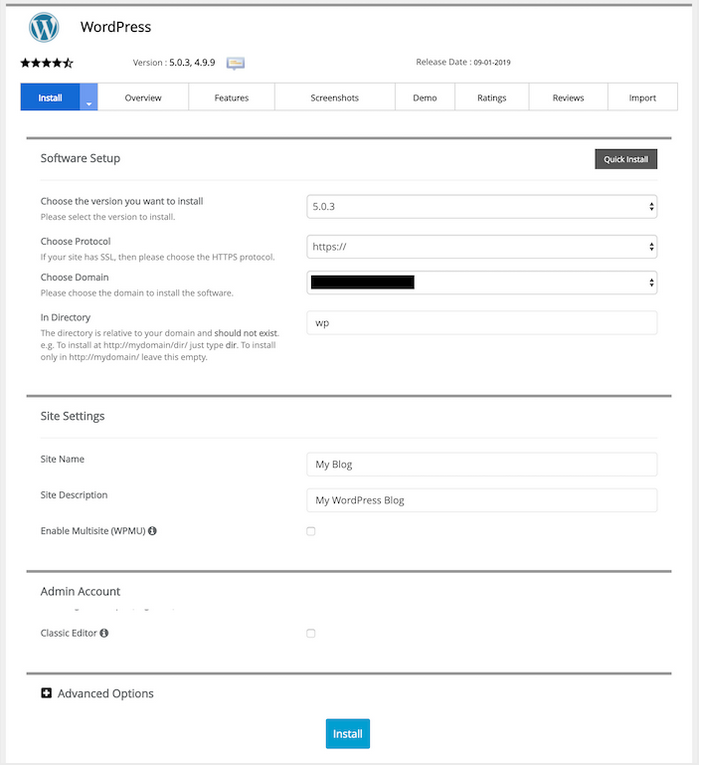
4. Thereafter, a WordPress page appears. Here, we clicked on install button which will then display the installation form.
For instance, the installation form appeared as follows. Then we filled the necessary information after confirming from the user.

Filling the installation form
In the Software Setup tab we saw the following options.
Choose Protocol : http is the default one, we use https only after purchasing SSL certificate.
Choose Domain : We select the desired domain or subdomain for this installation.
In Directory : In default, it install in main directory of the domain. Else we give the required directory.
Database Name : The default value begins with wp__. We can give custom name if needed.
Database settings : This filed is for security aspect. WordPress database table names begin with wp_. So that, its easy for hackers to identify. We must change it to something else like bob_.
Site Settings : Basic information of your website. This is used by most themes as well as the WordPress system.
Admin Username : Username for WordPress admin account.
Admin Password : Password for WordPress admin account.
The Admin Email : Email used for WordPress admin account.
Select Language : Language in which we install WordPress.
After filling all this required field in the installation form. Then we click on the Install button to start the installation process.
Finally, after completing WordPress installation, we receive a success message.
[Need any assistance in Installing WordPress? – We’ll help you]
Conclusion
In short, Installing WordPress using Softaculous is one of the easiest method which is really an effeicent method. Today, we saw how our Support Engineers helped the customers in installing the WordPress using Softaculous software.


0 Comments