Let us learn more about the JMeter SQL server JDBC driver. We will go through all of the configuration steps with the support of our MSSQL support Services at Bobcares.
What is Apache JMeter?
JMeter is an Apache project that can test web applications. Now it has the ability to fulfill other test activities. JMeter is a tool for measuring and monitoring the performance of websites and other services. With the JMeter we can run the following tests:
- Performance test
- Load test
- Stress test
- Functional test
Using JMeter for database performance and load testing: SQL Server
When we talk about performance, we usually refer to our website’s performance. We strive to tweak our web pages, CDN, and third-party plugins. We fail to test the performance of our databases. The database can be slow, especially if it is large. If the website calls stored procedures or complicated queries, it may take a long time to process the data.
It is important to note the database’s performance and load handling ability. JMeter is an open source tool that helps us evaluate performance.
Requirements :
- Java 8
- JMeter 5.0
Install Java 8 from the oracle site.
JMeter SQL server JDBC driver Configuration and setup
Step 1: Firstly, Start JMeter.
Step 2: Add The Tread Group and give it any name. After that Include the JDBC Connection Configuration in the Thread Group.
Select The Thread Group, Config Element, and Add JDBC Connection Configuration from the context menu.
Step 3: After that, we have to set the variable and the maximum number of connections.
We must give all of the database connection settings in the JDBC Connection Configuration. We can give any variable name for the newly created pool.
It is crucial to provide an appropriate name for the pool. This is necessary for the next SQL query requests. This variable name identifies connection pools, which are the settings we gave in Configurations.
Maximum Amount of Connections: We may choose any number based on the situation. This value allows a specific number of connections in the pool to open up at the same time.
Step 4: The next step in JMeter SQL server JDBC driver setup; we have to set up the database connection.
Enter the database URL:
jdbc:sqlserver:;DatabaseName=Example : jdbc:sqlserver:database.windows.net;DatabaseName=UserJDBC Driver Class:
com.mircrosoft.sqlserver.jdbc.SQLServerDriverAfter that, we have to enter the UserName and Password.
Step 5: After that, include the JDBC Request.
Select Thread Group (here, Database Testing)- JDBC Request -Add- Sampler from the context menu. We may now select any statement from the menu, such as Select, Callable, and so on. To access data, we can use the select statement. We can also use the Callable statement to perform a stored procedure.
Step 6: After that, include the Listener View Result Tree.

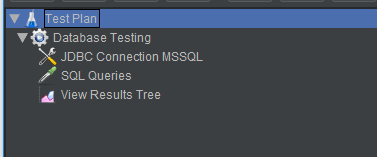
The image given below represents the Complete Test Plan:

Step 7: Finally, carry out the test plan.
At this point, it displays an error message. The error message is: “Cannot load JDBC driver class ‘com.microsoft.sqlserver.jdbc.SQLServerDriver”.
We can clear the Error by following the steps given below:
- Firstly, get the Microsoft JDBC Driver for SQL Server 7.0.
- After that unzip the.exe file into a particular folder.
- Thirdly, Navigate to sqljdbc 7.0enu in the Extracted folder. Confirm that.jar files are present.
- Finally, in the JMeter TestPlan, go to and select the.jar file. We must repeat the Test plan, and the outcome will open up after this procedure.
[Need assistance with similar queries? We are here to help]
Conclusion
To conclude we have now learned how to set up the JMeter SQL server JDBC driver. With the support of our MSSQL support services, we have gone through all of the setup steps.
PREVENT YOUR SERVER FROM CRASHING!
Never again lose customers to poor server speed! Let us help you.
Our server experts will monitor & maintain your server 24/7 so that it remains lightning fast and secure.


0 Comments