


Get ready to learn more about Kubernetes drupal deployment. Our Drupal Support team is here to lend a hand with your queries and issues.
Kubernetes Drupal Deployment Guide
Drupal is a well-known open-source content management system. It allows users to create and manage websites easily. Kubernetes is a popular open-source platform for containerized application deployment, management, and management.
Today, we are going to take a look at deploying a Drupal instance on a Kubernetes cluster. Before we begin, we have to ensure that we have an up-and-running Kubernetes cluster and that kubectl is installed on the workstation. Furthermore, a volume provisioner has to be deployed.
Step 1: Prepare the data persistence infrastructure
Our experts would like to point out that we have to use volumes in order to preserve the data because Kubernetes containers are not data-persistent. This ensures all changes written to the database or to any directory are not lost when the container restarts.
In fact, our experts recommend the PersistentVolume object in order to retain data. A PersistentVolume can be described as a representation of persistent storage. We can create it either statically or dynamically. Today, we are choosing a dynamically-created PersistentVolume because it is easier to manage.
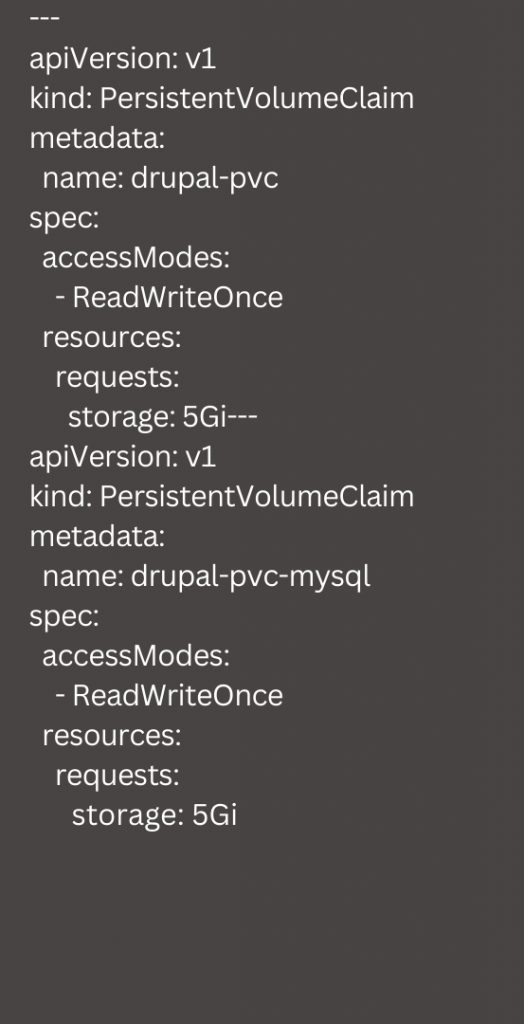
Next, we have to create a PersistentVolumeClaim by creating drupal-persistentvolumeclaim.yaml as seen here:
Next, we have to run the following command:
kubectl apply -f drupal-persistentvolumeclaim.yamlIf we are successful, we will be able to see the PersistentVolumes provisioned with the PersistentVolumeClaims bound to it.
Step2: Deploy MySQL instance
In order to deploy the MySQL instance we need a Deployment and a Service. We also need to run MySQL from the root. Our experts recommend using custom credentials. Then create the file drupal-mysql.yaml
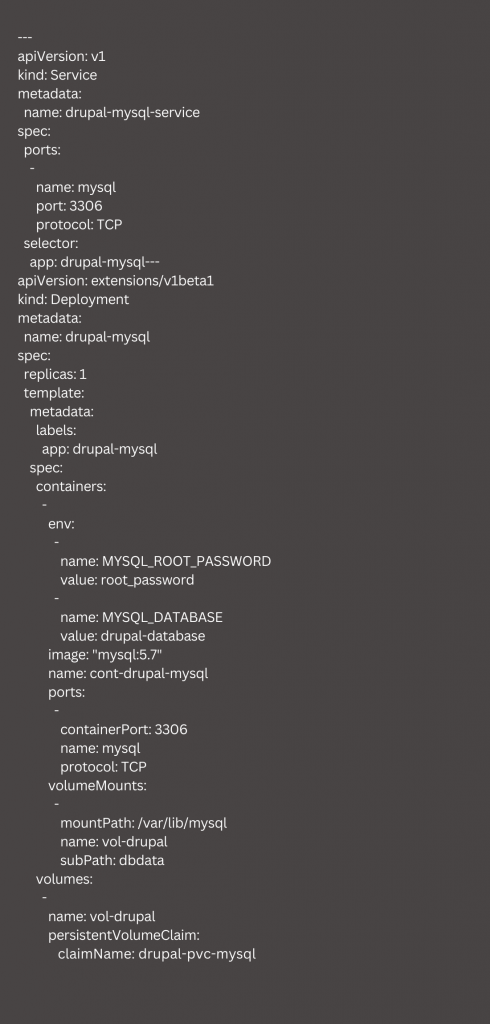
Next, we have to deploy MYSQL and then verify the pod is running.
Step 3: Deploy Drupal
The Deployment is based on a container with a Drupal image from the Docker Hub repository. Furthermore, we will use a container (InitContainer) to pre-populate the persistent storage with the data used by Drupal. To do this, we have to create drupal.yaml file:
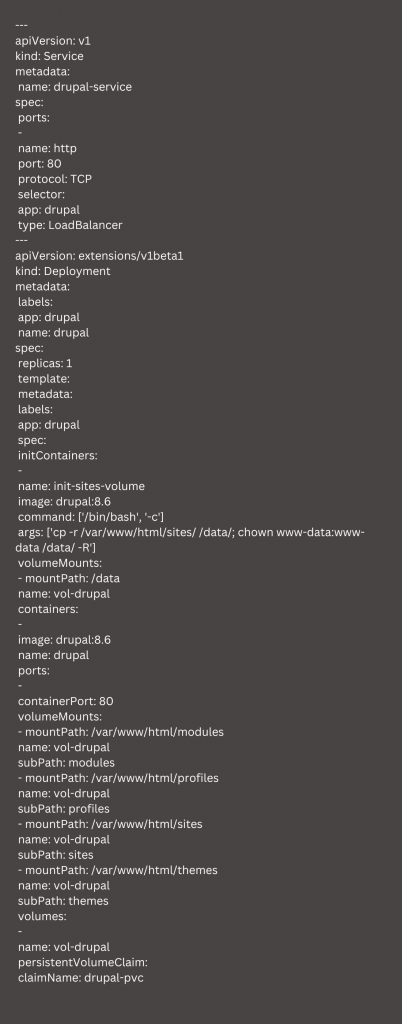
Then, we have to deploy it and then wait for a few minutes before running the command to get the IP address assigned by Kubernetes to the service.
Step 4: Install Drupal
After deploying the infrastructure, it is time to install Drupal. Our experts recommend following the wizard instructions to get the job done. However, remember to keep the credentials from the earlier steps on hand to complete the installation.
Let us know in the comments if you run into any trouble with the Kubernetes Drupal deployment process.
[Need assistance with a different issue? Our team is available 24/7.]
Conclusion
To sum up, our Support Techs demonstrated how to deploy a Drupal instance on Kubernetes.
PREVENT YOUR SERVER FROM CRASHING!
Never again lose customers to poor server speed! Let us help you.
Our server experts will monitor & maintain your server 24/7 so that it remains lightning fast and secure.


0 Comments