


Please Note: This article is part of our historical archive. Because it was published a while ago, some of the information, links, or context may now be outdated.
Resizing the Nagios VM disk size for centos 7 can be done either manually or automatically using a script.
Here at Bobcares, we have seen several such Nagios-related errors as part of our Server Management Services for web hosts and online service providers.
Today we’ll take a look at how to fix this Nagios disk space problem.
Resizing the Nagios VM disk size for centos 7
Now let’s see how our Support Engineers resize the Nagios virtual machine (VM) disk for CentOS 7.
First, we check the version of CentOS by running the below command.
cat /etc/centos-release
If the version is 6, the output will be something like:
CentOS release 6.9 (Final)
If the version is 7, the output will be something like:
CentOS Linux release 7.4.1708 (Core)
However, we recommend taking a proper backup before proceeding with resizing the virtual machine.
Resizing The Virtual Disk
First, we modify the amount of disk space VMware is allocating to Nagios image. If we are using another hypervisor like Hyper-V or VirtualBox then these settings will be slightly different from the steps below.
We recommend shutdown and power the VM off before resizing the virtual disk.
We can find the virtual disk size setting under:
(VM) >> Summary >> Commands >> Edit Settings >> Hardware >> Hard Disk 1 >> Capacity >> New Size.
For VMware Player, we can find the disk size setting using the following options on the overview page:
(VM) >> Edit virtual machine settings >> Hardware >> Hard Disk (SCSI) >> Utilities >> Expand >> Maximum disk size.
We power the VM back on after increasing the disk space.
Resizing The Partition/Filesystem
We can follow any of the below 2 methods to resize the partition and filesystem.
1. Automated With Script
We run the below commands to automatically resize the partition and filesystem on VM. After the completion of the script, it will automatically restart the Nagios server.
cd /tmp
wget https://assets.nagios.com/downloads/common/scripts/extend_vm_disk.sh
sh extend_vm_disk.sh
We will see output similar to the below one:
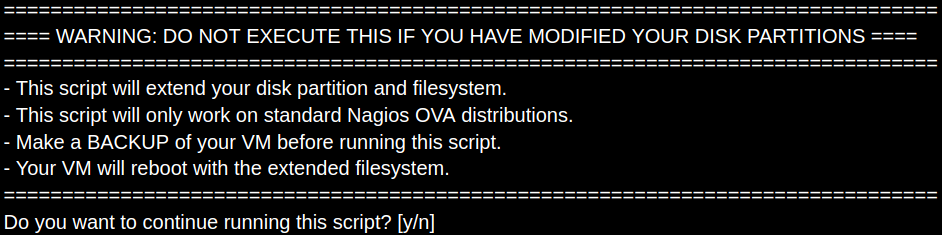
Here, we will answer y to proceed.
After the server reboots, we login as the root user in a terminal session. Then we will see a message similar to:

In the above message, the sizes differ depending on how much extra disk space we add.
This completes the automatic steps for increasing the VM disk size.
2. Manually
Here are the steps to manually resize the VM partition and filesystem.
1. Resizing The Partition
We need to modify the Linux partition table within the virtual machine to recognize that the disk size has changed. We can do this using the fdisk utility. For the virtual machine provided by Nagios Enterprises:
- sda1 is used for the boot partition
- sda2 is the device for all logical volumes, this is the partition we need to edit
First, we start fdisk by executing the following command.
fdisk /dev/sda
Next, we print the current partition table so we can keep track of the changes.
Command (m for help): p
We take a screenshot or copy the screen contents into a text file in case we want to reference it later.
To resize a partition, we actually “delete” it and then add a new one with the new size. Also, we make sure to place the beginning of the new partition at the same sector/cylinder as the old one started. This process is NOT destructive, the data still remains on the disk. These first steps are for deleting the partition.
Command (m for help): d
Partition number (1-4): 2
These steps re-create the partition:
Command (m for help): n
Partition type:
p primary (1 primary, 0 extended, 3 free)
e extended
Select (default p): p
Partition number (2-4, default 2): 2
We will be prompted for the first and last sectors to use. So we simply accept the defaults for the start and endpoint (just press Enter). Also, we double-check that they make sense when compared to the information printed earlier.
Next, we need to configure the partition type to LVM (8e):
Command (m for help): t
Partition number (1,2, default 2): 2
Hex code (type L to list all codes): 8e
Changed type of partition 'Linux' to 'Linux LVM'
Now we are done making the changes, so we just need to write them to the disk. It is a good idea to print (p) the new partition table to ensure we entered things correctly. Once thing look okay, we can commit (write) the partition table to disk:
Command (m for help): w
The partition table has been altered!

Calling ioctl() to re-read partition table.

WARNING: Re-reading the partition table failed with error 16: Device or resource busy.
The kernel still uses the old table. The new table will be used at
the next reboot or after you run partprobe(8) or kpartx(8)
Syncing disks.
The write command will exit the fdisk program. So, now we need to reboot the virtual machine to allow the kernel to recognize the new partition table. For that, we execute the following command:
reboot
2. Resizing The Physical Volume (PV)
The CentOS system installed in the virtual machine image we ship uses Logical Volume Management (LVM) for its partitions.
In order to make use of the newly increased disk space, LVM needs to be told that it is there and should be used. For this step we will adjust the size of the physical volume to match the new size of the partition. For that, we establish a terminal session to the Nagios server and then execute the following command:
pvresize /dev/sda2
This should produce the following output:
Physical volume "/dev/sda2" changed
1 physical volume(s) resized / 0 physical volume(s) not resized
3. Resizing The Logical Volume (LV)
Now we resize the logical volume to use the new space available in the LVM physical volume. For that, we run the following command:
lvresize /dev/mapper/centos-root /dev/sda2
This will produce the following output (it will differ depending on how much disk space we’re adding):
Size of logical volume centos/root changed from 36.99 GiB (9470 extents) to <77.00 GiB (24831 extents).
Logical volume centos/root successfully resized.
4. Resizing The Filesystem
As a last step, we change the filesystem residing on the logical volume so that it knows to put files in that space. For that, we execute the following command.
xfs_growfs /dev/mapper/centos-root
This will produce the following output (it will differ depending on how much disk space we’re adding):
meta-data=/dev/mapper/centos-root isize=512 agcount=4, agsize=406016 blks
= sectsz=512 attr=2, projid32bit=1
= crc=1 finobt=0 spinodes=0
data = bsize=4096 blocks=1624064, imaxpct=25
= sunit=0 swidth=0 blks
naming =version 2 bsize=4096 blocks=2560, version=2
= sectsz=512 sunit=0 blks, lazy-count=1
realtime =none extsz=4096 blocks=0, rtextents=0
data blocks changed from 1624064 to 4769792
Finally, now we can confirm the disk resize worked by using df -h to display a summary of filesystem size and usage.
[Need any further assistance in resizing Nagios VM disk size? – We are here to help you]
Conclusion
Today, we saw how our Support Engineers resize the Nagios VM disk size.
