


Set up Django on the latest Plesk Onyx with this handy guide from the top experts at Bobcares.
At Bobcares, we offer solutions for every query, big and small, as a part of our Server Management Services.
Let’s take a look at how our Support Team is ready to help customers set up Django on the latest Plesk Onyx.
How to set up Django on the latest Plesk Onyx
Our Support Techs have come up with this handy guide to help set up Django on the latest versions of Plesk Onyx. The process involves the following steps:
- Install Python
- Pre-configure the web server-management
- Deploy the web
Step 1: Installing Python
First, we have to check if Python is already present in the system. We can do this by issuing the following command with root server access:
python36 –version
If Python is present, we are likely to see an output similar to the one below:
Python 3.6.6
However, if the command does not yield an output, we can install Python with the help of these commands:
- Add EPEL repository and then install Python 3.6 with the commands below:
# yum install -y epel-release
# yum install -y python36
- We can also download and then install the Python package manager as seen here:
# wget https://bootstrap.pypa.io/get-pip.py
# python36 get-pip.py
Our Support Team would like to point out it is a common practice to ensure there is a separate virtual environment for each Python application. We do this by installing the “virtualenv” package with the following command:
python36 -m pip install virtualenv
After that, we will install Phusion Passenger as we will be using it as an application server for hosting Django projects:
yum update
plesk installer --select-release-current --install-component passenger
Step 2: Pre-configuring the Web Server
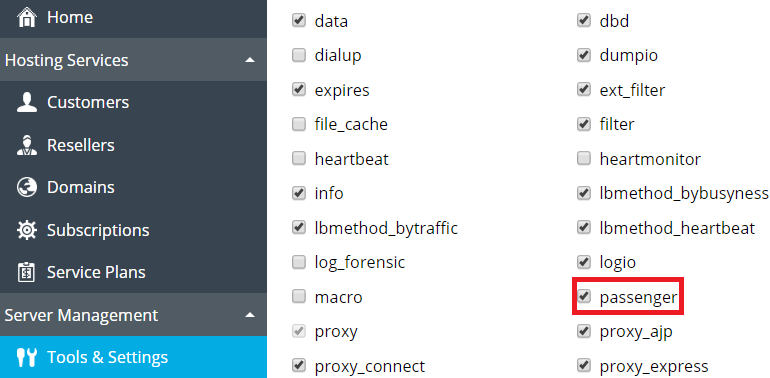
- In this section, we enable the passenger module by navigating to Apache Web Server Settings under Tools & Settings as seen in the image below:
- Then, head to the Service plan that we are using for domains with Django Apps and enable Proxy mode (in case NGINX is present on the server).
- Next, add the following directives in the Web Server tab:
- PassengerEnabled On
- PassengerAppType wsgi
- PassengerStartupFile passenger_wsgi.py
- After that, set shell option in the Hosting Parameters tab and save the configuration.
Step 3: Deploying the App
- First, the Subscription under Service Plan and navigate to domain’s Document Root:
cd ~/httpdocs/
- Then, move the existing files to the backup directory present in the subscription:
mkdir ~/backup
$mv ~/httpdocs/* ~/backup/
- Next, make the virtual environment for the App with this command:
python36 -m virtualenv -p python36 python-app-venv
- After that, enter the virtual environment and install the Django framework in addition to checking if we can import it with these commands:
source ./python-app-venv/bin/activate

pip install Django
python -c "import django;print(django.get_version())"
2.0.3
- Then, create a passenger startup file passenger_wsgi.py inside of django-app environment to serve the application through the application server.
import sys, os
ApplicationDirectory = 'djangoProject'
ApplicationName = 'djangoProject'
VirtualEnvDirectory = 'python-app-venv'
VirtualEnv = os.path.join(os.getcwd(), VirtualEnvDirectory, 'bin', 'python')
if sys.executable != VirtualEnv: os.execl(VirtualEnv, VirtualEnv, *sys.argv)
sys.path.insert(0, os.path.join(os.getcwd(), ApplicationDirectory))
sys.path.insert(0, os.path.join(os.getcwd(), ApplicationDirectory, ApplicationName))
sys.path.insert(0, os.path.join(os.getcwd(), VirtualEnvDirectory, 'bin'))
os.chdir(os.path.join(os.getcwd(), ApplicationDirectory))
os.environ.setdefault('DJANGO_SETTINGS_MODULE', ApplicationName + '.settings')
from django.core.wsgi import get_wsgi_application
application = get_wsgi_application()
Our Support Engineers would like to point out that we have to replace the variable values in lines 2 and 3 with the corresponding accurate values and then save the file.
- Next, create Django project and allow serving requests from any host:
django-admin startproject djangoProject
sed -i "s/ALLOWED_HOSTS = \[\]/ALLOWED_HOSTS = ['*']/" djangoProject/djangoProject/settings.py
- Then, create a tmp directory for application caches and restart the application:
mkdir tmp
touch tmp/restart.txt
- Finally, change Domain Document Root and we will see the application if the procedure is successful.
[Looking for a solution to another query? We are just a click away.]
Conclusion
In brief, our skilled Support Engineers at Bobcares demonstrated how to set up Django on the latest Plesk Onyx%.
PREVENT YOUR SERVER FROM CRASHING!
Never again lose customers to poor server speed! Let us help you.
Our server experts will monitor & maintain your server 24/7 so that it remains lightning fast and secure.


0 Comments