


Please Note: This article is part of our historical archive. Because it was published a while ago, some of the information, links, or context may now be outdated.
In our previous post on configuring ‘Container as a Service’ in oVirt, we discussed how we deployed a scalable Docker infrastructure for application developers. Our first phase of implementation was focused on creating Docker containers within VMs.
The next stage was setting up a management software that enabled app developers to create, scale and delete the Docker containers. We used an open source application called Docker Swarm for this purpose.
See how our WHMCS oVirt plugin helps you!
We setup “Docker Swarm”, and a management interface called “Shipyard” in each Docker VM. App developers could easily add, modify or delete Docker containers using the Shipyard interface.
Docker Swarm grouped different containers into “Swarms”. A ‘Swarm master’ ruled a set of ‘Swarm agents’ (aka Docker nodes) that hosted the containers. Here is a walk-through of our setup.

Docker Swarm setup in oVirt
1. Creating a Docker Swarm
By default, the Docker service accepts connections only from other processes within the server. For setting up the Swarm, we re-configured Docker service to accept external connections. We configured a Swarm master and Swarm agent, which listened on port 2374 and 2375 respectively. Then we created the Swarm.
 [root@docker7 ~]#  docker run swarm create
  latest: Pulling from swarm
 ff560331264c: Pull complete
 d820e8bd65b2: Pull complete
 2cdc13bce47d: Pull complete
 9ffeeb93a95b: Pull complete
 fe877fe8bc0b: Pull complete
 79509bf8b8cd: Pull complete
 22218d75fdd7: Pull complete
 e9ff33e7e5b9: Pull complete
 swarm:latest: The image you are pulling has been verified. Important: image verification is a tech preview feature and should not be relied on to provide security.
 Digest: sha256:c21fd414b0488637b1f05f13a59b032a3f9da5d818d31da1a4ca98a84c0c781b
 Status: Downloaded newer image for swarm:latest
 57315c8351c144feb2ef5c9c3dd6d769
The new Swarm had the unique ID ‘57315c8351c144feb2ef5c9c3dd6d769’. Docker used this ID to manage the Swarm.
[ Looking for the WHMCS plugin to manage your oVirt interface? Get our WHMCS plugin for oVirt management here. ]
2. Adding master and agents to the Swarm
Here is how we added master and agent to the Swarm using the Swarm ID.
Adding Master
[root@docker7 ~]#  docker run -d -p 2374:2375 swarm manage token://57315c8351c144feb2ef5c9c3dd6d769
 fd863ea3b07a1466cbfbc181eea4361fb979e9bb416810873c276052cc80ff90
Adding Agent
[root@docker7 ~]#  docker run -d swarm join --addr=172.17.5.47:2375 token://57315c8351c144feb2ef5c9c3dd6d769
 64df95bc08dad7cfe940c279e332cf56f57cfd1c6ccd359e87240023c05dc259
Once part of the Swarm, the agent could be easily managed from the Swarm master.
3. Shipyard web interface to manage containers
Docker Swarm did not provide an easy web interface for users to manage and scale up their containers. To resolve this, we installed and configured an open-source Swarm management software called Shipyard. Built on Docker Swarm, Shipyard enabled management of Docker resources including containers, images and repository.
Shipyard uses RethinkDB database, an open-source scalable database that enables fast creation of containers. So, as the first step of installing Shipyard, we launched a RethinkDB container. We then linked this Shipyard API to our Swarm manager and Swarm agent containers. Finally, a Shipyard Controller was configured and initialized to generate a web interface.
Once the Swarm configuration and setup was completed, the containers in the Docker Swarm were listed in the Shipyard API as seen here.

Docker Containers in Shipyard
Using this Shipyard GUI, users could manage their containers, images and repositories, all in a few clicks.
i. Adding user accounts in Shipyard
The VM owner could create multiple user roles to manage the Docker containers using the ‘Shipyard -> Accounts’ option.
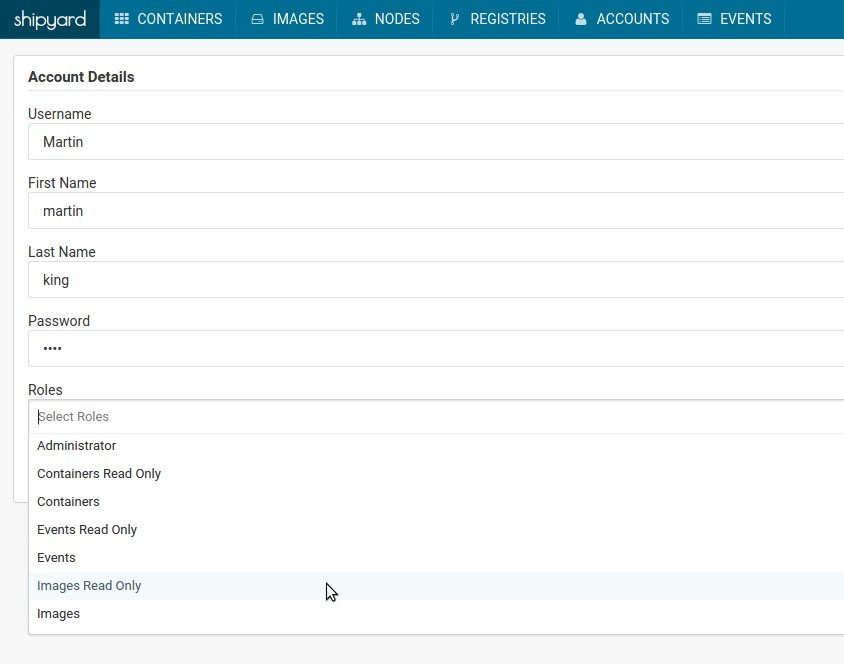
Adding user accounts in Shipyard
[ Looking for custom plugins to manage your portals? Contact us to get tailor-made plugins to serve your business purposes. ]
ii. Managing containers
Users could manage their containers using the Shipyard interface. They could Start, Stop, access the console or even Destroy their Docker containers using this interface.

Container management in Shipyard
Users could create a new container from the Container Deployment interface.

Create container in Shipyard
iii. Scaling up resources in containers
In our Swarm management interface, users could easily scale up their applications to multiple containers.

Scale up container resources
Fast provisioning is a core feature in any cloud hosting solution. Here we’ve covered how Docker VM provisioning and management was made easy for an oVirt cloud system. Bobcares helps cloud providers, data centers and web hosts deliver industry standard cloud services through custom configuration and maintenance of server virtualization systems.
