On December 2015, the much-awaited PHP 7 was released. With its new version of the Zend Engine, PHP 7.0 proved to be two times faster than PHP 5.6.
In PHP 7, code execution became faster and it requires only less number of servers to handle the same website traffic. In WordPress hosting, speed is a crucial requirement.
As a result, WordPress websites are now increasingly preferring PHP 7, as they can run with lesser CPU resources than that was required with PHP 5.x versions.
To reap the benefits offered by PHP 7 in your WordPress website, you have to upgrade PHP in the server to version 7. Here’s how to do it.
Steps to install PHP 7 in Ubuntu server
Today, we’ll discuss how to install PHP 7 in your Ubuntu server.
1. Download the repository for PHP 7 in the server
PHP 7 is not available in the default repository. You have to add the PHP repository in the server to download the software using the command:
add-apt-repository ppa:ondrej/php
For the ‘add-apt-repository’ command to work, the package ‘python-software-properties’ should be installed first in the server.
The repository addition may fail if the locales are not enabled, and you would have to generate them first. For non-UTF-8 locales, the command to be used is:
LC_ALL=en_US.UTF-8 add-apt-repository ppa:ondrej/php
2. Update the packages from the newly added repository
Once the repository is added, download the latest software packages from it using:
apt-get update
3. Install PHP 7 software
The command to install PHP 7 varies with the webserver you are running in the server.
For Apache, use 'apt-get install php7.0'
In NginX, use 'apt-get install php7.0-fpm'
4. Install the php-mysql package
For servers with MySQL database support, download the php-mysql package.
apt-get install php7.0-mysql
5. Verify the PHP version
Once the installation is complete, PHP 7 would be enabled in the server. You can verify it using ‘php -v’ command.

PHP version 7 in Ubuntu
Configure webserver to use PHP 7
Once the PHP is installed, the next step is to configure your webserver to use this PHP 7.
The configuration for PHP 7 varies with the webserver used – Apache or NginX. The configuration files are generated in the folder ‘/etc/php/7.0’ during install.
Apache:
For PHP 7 to work with apache webserver, the Apache 2 PHP module – package ‘libapache2-mod-php7.0’ – has to be installed.
Remove the traces of old PHP 5.x version from the server and apache config file and enable the new PHP 7 version.
Install other PHP modules for Apache, such as ‘php7.0-mcrypt’ and ‘php7.0-curl’. Restart apache service and verify the PHP version using phpinfo() page.
NginX:
Configure NginX webserver to use PHP version 7, by giving the socket path in the config file. The socket file for PHP 7 would be in the path ‘/var/run/php/php7.0-fpm.sock’.
To update this socket file path in the config file, open ‘/etc/nginx/sites-enabled/default’, find the line starting with ‘fastcgi_pass’ and change it as:
fastcgi_pass unix:/var/run/php/php7.0-fpm.sock;
Once PHP 7 is enabled for all the virtual sites in the server, restart the NginX webserver. Confirm this new PHP version using phpinfo() pages.
Update the WordPress version in website
Once the PHP version is updated, we can upgrade the WordPress in the website to the latest available version.
WordPress version of a website can be easily updated in one-click. This can be done from the ‘Dashboard > Updates’ screen.
Once you are on the “Update WordPress” page, click the button “Update Now” to start the upgrade process. WordPress would be updated to the latest version.
Before update, take latest backup of the website files and database, to restore if required. Also, any custom coding done in WordPress may be lost in the update.
For websites where the one-click update fails, it is advisable to do a manual update, for the website to work fine.
Testing the WordPress site performance with PHP 7
PHP 7 is reported to give double the speed for website applications, compared to PHP 5.
To verify this, before and after switching the WordPress site to PHP 7, we tested the site speed using Apache Benchmark.
The stats was compared to the site performance in PHP 5.5.9, the earlier version that was running in the server.
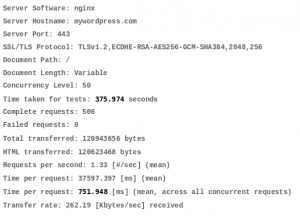
Speed test results were obtained as below:

WordPress website speed with PHP 5.x
With PHP 5.x, the response time for the website was about 751 ms.
This was reduced by about 50%, to 317 ms, after switching to PHP 7, as seen from the Apache benchmark results here:

WordPress website speed with PHP 7
This Apache benchmark test for speed test clearly shows the benefit of PHP 7, as the latter has helped to speed up the WordPress site by 100%.
Points to note..
While the significant improvement in website speed is a tempting factor for WordPress site owners to switch to PHP 7, there are a few points to note before upgrade.
- The WordPress version should be compatible with PHP 7. WordPress 4.4 and above works fine with PHP 7.
- If there are any old WordPress installations with custom configuration or code, upgrading the PHP may break its working.
- The themes and plugins of the WordPress sites should also be ensured to be compatible with PHP 7.
- Other software in the server which do not work with PHP 7, may break when an upgrade is done.
- Servers can be configured to switch between two versions of PHP, if required. It is always advisable to keep backups to revert to.
If you’d like to know how to manage your WordPress servers to get the best performance out of them for your business, we’d be happy to talk to you.


0 Comments