I accidentally created a Vultr instance with CentOS, but I want to change the OS. Can you change it to Ubuntu?
That was a recent support ticket received at our Server Management Services department where we manage customer’s servers.
Server owners often request to change operating systems when they choose wrong OS during server setup, during server re-installation, security updates, and more.
Today, we’ll discuss how our Support Engineers safely change the Vultr OS without any data loss.
How to change OS on Vultr instance – Steps explained
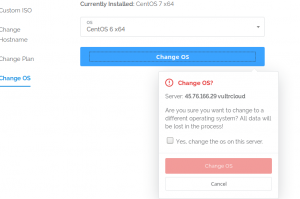
Vultr provides the option that allows server owners to change the OS on their Vultr instance in a single click. They can change their Vultr instance OS from the Vultr account control panel using the below steps.
Servers > Click on the Vultr Cloud Compute > Settings > Change OS > Select the OS > Click on Change OS.

How to change the OS in Vultr server?
The advantage here is that the IP address stays the same. However, this is a destructive process where all the data on the server will be wiped out.
Since the entire data will be lost during the OS change process, our Server Experts recommend this option only for fresh or new servers. In other words, this option is perfect for servers where there is no critical data on the server. In this case, we always get a confirmation from the customer before proceeding.
Now, you may be thinking how can we change the OS on a live server. Here are the steps followed by our Support Engineers to change the OS on a live server without data loss.
1) Analyze the Vultr Cloud Compute
The first and the most important step is to do a complete analysis of the existing Vultr instance. Our Support Experts focus mainly on collecting website information, website DNS details, existing software versions such as PHP, Apache, MySQL, custom configurations on the website, etc.
So, this data will help us to check the working of websites and the software versions during a post check.
2) Create a Vultr instance with new OS
The next step is to create a new instance using the new OS version. We create a new Vultr instance from Servers > Deploy new server(+ symbol) via Vultr control panel.

How to create a new Vultr server?
Most importantly, our Server Experts make sure that the disk space and other resources of the new instance is same or higher than that of the original instance. In addition to that, we ensure that the version of web server, database server also matches.
3) Manually migrate data to the new Vultr instance
Vultr doesn’t provide the option of backing up individual website files and databases. So, a manual migration is required to move files from the old Vultr instance to the new one. Our Support Engineers use Rsync command to copy website files easily without much bandwidth usage.
For example, to transfer the folder test/ from old Vultr instance to the new one, we use the following command.
rsync -avz test/ root@xx.xx.xx.xx:/home/
Here, xx.xx.xx.xx is the IP address of the new Vultr instance. For migrating multiple files, our Server Experts write command line scripts to execute this task effectively.
Similarly, we restore the MySQL databases on the new Vultr instance. Here, we backup the MySQL databases as .sql file and copy it to the new server using rysnc command. Moreover, we create database users on the new server and assign proper privileges.
4) Switch the DNS
Now, we have created a Vultr instance with new OS and migrated all the data to this server. Finally, we need to change the DNS of the websites to point to the new IP address. In other words, we point the DNS records of the websites to the new Vultr instance.
Vultr Change OS – Post checks to be done
We’ve now changed the operating system of the Vultr instance without any data loss. But, our Support Engineers take one step forward and verify the working of websites and software versions. For instance, we do the following post checks.
- Firstly, we ensure that the new server is accessible fine.
- There are chances that the services on the new instance expected to be running weren’t set to start on boot. So, we manually check and confirm that the services on the new instance are running fine.
- Check the resource allocation on the new server and confirm that it matches with the old server.
- Similarly, we ensure that the web server, database server, PHP configurations and their versions are correct.
- Additionally, we test the websites and confirm that they load fine.
- We’ll correct the website files having references to old IP address.
[And, do you need help to change the OS on your Vultr server? One Server Experts can help you here.]
Conclusion
In short, changing OS on a Vultr instance always involves the risk of losing data. Today, we’ve discussed how our Support Engineers effectively change the OS of Vultr server without potential data loss.


0 Comments