Windows and Linux systems are peculiar in their own ways.
How many times have you thought of having the privilege to run a bash script on Windows?
Luckily, Windows Subsystem for Linux allow users to run Linux commands on a computer with a Windows operating system.
At Bobcares, we help customers to install Windows server 2019 Linux Subsystem as part of our Server Administration Services.
Today, we’ll see the benefits of Windows Subsystem for Linux and how our Support Engineers make it working.
How is Windows Subsystem for Linux helpful?
Before proceeding further, let’s get an idea about the benefits of Windows Subsystem for Linux (WSL).
In Windows 2019, Microsoft introduces many new features and Linux subsystem is a prominent one among them.
Basically, WSL works as a compatibility layer for running Linux binaries in Windows 2019 systems.
The typical benefits include:
- Allows both Windows and Linux environments to run simultaneously.
- Requires less overhead resources of computer like processor, memory and storage
As a result, developers can use common Linux tools and development languages such as Ruby and Python to operate through Windows.
However, Windows Subsystem for Linux has its own limitations too. It does not support Linux graphical interface. Also, it does not support all Linux applications.
How to setup Windows server 2019 Linux Subsystem?
Recently, one of our customers came to us for advice on running Linux scripts in a Windows environment.
Here, our Support Engineers advised the customer to go ahead with Windows 2019 server version that has native support for Linux Subsystem. Let’s now see how we enabled it for him.
Step 1. Setup Windows 2019 server
Primarily, we set up the new machine with Windows 2019 server version. We then double check the build version and install all the updates on the server.
Step 2. Enable Windows Subsystem for Linux feature
Now, to enable Windows Subsystem for Linux, we run the following command in PowerShell:
Enable-WindowsOptionalFeature -Online -FeatureName Microsoft-Windows-Subsystem-Linux
This prompts for a server reboot as shown below.

When the server is back online, Server now supports Linux environment.
Step 3. Download packages for Linux
Now, we download the desired Linux package. Windows 2019 allows distributions like Ubuntu, OpenSuse, etc.
For example, to download and install Ubuntu package, we use the command:
Invoke-WebRequest -Uri weburl -OutFile ~/Ubuntu.zip -UseBasicParsing
Here, we substitute the weburl with the actual download link of Ubuntu. For example, a sample link is https://aka.ms/wsl-ubuntu-1804
This downloads the Ubuntu 18 package and makes it available at Ubuntu.zip. Further, to unpack the files, our Support Engineers use the command:
Expand-Archive ~/Ubuntu.zip C:\Distros\Ubuntu
Step 4. Set user and connect
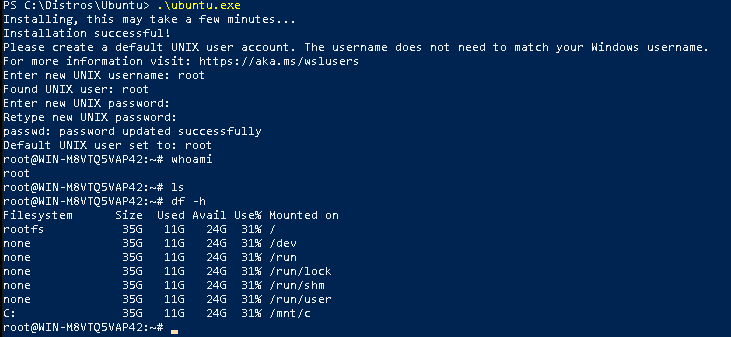
Finally, it’s now time to set the Linux user and connect to the Linux environment using the ubuntu.exe binary.
After connection, our Support Engineers set a default user for Linux and a complex password. The exact session will look as shown in the picture.

That’s it. Now, you can successfully connect and execute Linux scripts and commands.
[Looking for custom solutions on Windows 2019 servers? Our experts can help you.]
Conclusion
In a nutshell, the Windows server 2019 Linux Subsystem makes it possible to set up a Linux environment in a Windows server. Today, we saw how our Support Engineers set up Linux Subsystem on the Windows server and make it work.


0 Comments