Deadpool in Nagios XI can be used easily with the help of this convenient guide by the in-house experts at Bobcares.
At Bobcares, we offer solutions for every query, big and small, as a part of our Server Management Services.
Let’s take a look at how our Support Team is ready to help customers utilize Deadpool in Nagios XI.
How to use Deadpool in Nagios XI
Today, our Support Engineers are going to demonstrate how to make optimal use of the Deadpool feature in Nagios XI.
We can enable this convenient feature by heading to Admin > Monitoring Config > Deadpool Settings and clicking the Enable the deadpool processor checkbox.
Alternatively, we can opt to discard performance data when a service or a host is deleted and receive email notifications of deadpool activity. In order to activate this service, we have to enter an email address in the Email Recipients box.
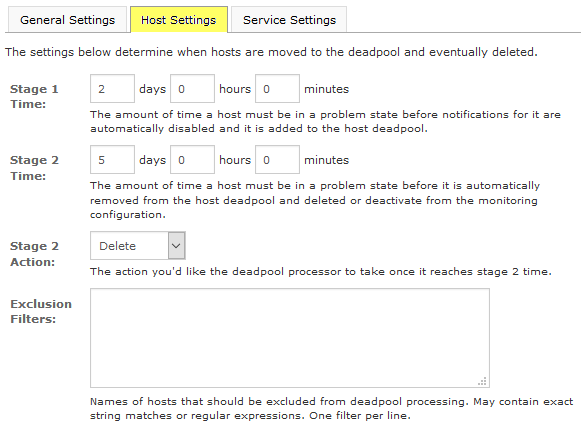
The Deadpool Feature offers two tabs as seen below:
Host Settings:

Service Settings:

- Stage 1:
This indicates the duration an object has to be in a problem state before disabling notifications and adding the object to the Deadpool.
- Stage 2:
This indicates the duration an object has to be in a problem state before removing it automatically from the Deadpool and deleting or deactivating it from the monitoring configuration.
- Stage 2 Action:
This allows us to define whether we want to delete or deactivate an object when it is at Stage 2.
- Exclusion Filters:
These filters preclude objects from the settings above. We have to use exact string matches or PRCE regular expressions in this filter.
Behavior and Exclusion
- According to our Support Techs, problem states are “UNKNOWN” or “CRITICAL” for services and “DOWN” for hosts.
- A host or service has to reach Stage 1 criteria before evaluating the deletion time. Furthermore, the deletion time has to be at a minimum of five minutes more than Stage 1 time.
- The deletion time includes the entire time a service or host is in the problem state.
- Moreover, Deadpool does not function retroactively.
- Although we can use regex expressions like \w, \s, \d, we have to add another backslash at the start of the expression. For instance,
/\s*/
would become:
/\\s*/
How To Check Hosts & Services Moved To A Deadpool
Once a service or host meets the Stage 1 time criterion, it results in the creation of a new servicegroup or hostgroup known as service-deadpool or host-deadpool by Nagios XI. Thereby, every host or service meeting the stage 1 time criterion move to the corresponding group.
We can take a look at the current status of the service deadpool can be seen by navigating to Home > Details > Servicegroup Summary.
Similarly head to Home > Details > Hostgroup Summary to look at the current status of the host deadpool.
Troubleshooting
According to our Support Team, we can find the Host and service check failures in the /var/log/messages and /usr/local/nagios/var/nagios.log log files.
Furthermore, the Deadpool status information can be found at the /usr/local/nagiosxi/var/deadpool.log file. This file is updated each time deadpool.php runs.
If we wish to remove a host or service from the corresponding deadpool group, it can be done via the Core Config Manager(CCM).
[Looking for a solution to another query? We are just a click away.]
Conclusion
In brief, our skilled Support Engineers at Bobcares demonstrated how to use Deadpool in Nagios XI.
PREVENT YOUR SERVER FROM CRASHING!
Never again lose customers to poor server speed! Let us help you.
Our server experts will monitor & maintain your server 24/7 so that it remains lightning fast and secure.


0 Comments