


Follow this NGINX reverse proxy Raspberry Pi setup guide for seamless traffic. Our NGINX Support team is ready to assist you.
NGINX Reverse Proxy Raspberry Pi Setup Guide
NGINX is a fast, open-source web server and reverse proxy that efficiently manages web traffic. Using a Raspberry Pi, you can set up NGINX to route external requests to internal services, improving speed, security, and reliability. This guide covers the requirements and step-by-step instructions to install, configure, and test NGINX as a reverse proxy.
What is Nginx?
NGINX, pronounced “engine-ex,” is a high-performance open-source server that efficiently handles web traffic using an event-driven, asynchronous architecture. It serves content directly, acts as a reverse proxy, balances loads across servers, and caches data to boost speed and reliability. Trusted by millions of websites, NGINX ensures stable, fast, and scalable performance for both small blogs and high-traffic platforms.
Hardware and Software Requirements
Hardware Requirements:
- Raspberry Pi: Use Raspberry Pi 3 or newer; Raspberry Pi 4 (4GB or 8GB RAM) is ideal for heavier workloads.
- MicroSD Card: Minimum 32GB, Class 10 or UHS-I recommended for fast and reliable performance.
- Power Supply: A stable power source designed for your Raspberry Pi model.
- Case with Heatsinks/Fan: Helps prevent thermal throttling, especially for Raspberry Pi 4.
- Ethernet Cable: Prefer a wired connection for more stable and reliable network performance.
Software Requirements:
- Operating System: Unix-like OS such as Raspberry Pi OS Lite or Desktop.
- NGINX: Install via the package manager to act as the reverse proxy.
- Sudo or Root Access: Required to install software and configure system settings.
- Command Line Knowledge: Familiarity with Linux commands for installation, configuration, and troubleshooting.
- Firewall Configuration: Ensure traffic on ports 80 (HTTP) and 443 (HTTPS) is allowed to reach the NGINX server.
Understanding NGINX Proxy_Redirect and Its Configuration
How a Reverse Proxy Works
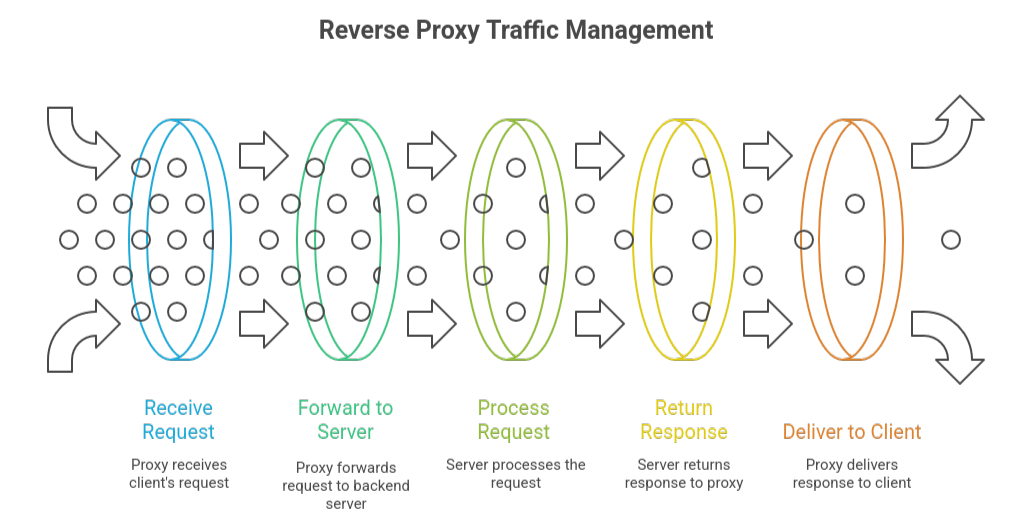
A reverse proxy efficiently manages web traffic by acting as an intermediary between clients and backend servers. When a client sends a request, the reverse proxy receives it first and intelligently forwards it to the correct backend server, ensuring the request is processed quickly and securely. By handling these interactions, it hides the identity of backend servers, improving security while preventing overload through load balancing. Additionally, a reverse proxy can cache content, compress data, and optimize connections, boosting performance and enhancing user experience. With centralized logging and SSL/TLS handling, it becomes an essential tool for modern websites and applications, streamlining traffic management while maintaining reliability and speed.
Step-by-Step Nginx Installation
Step 1: Update System
sudo apt update && sudo apt upgrade -yStep 2: Install and Start NGINX
sudo apt install nginx -y

sudo systemctl start nginx

sudo systemctl enable nginx
Step 3: Configure Firewall
sudo ufw allow 'Nginx HTTP'

sudo ufw allow 'Nginx HTTPS'

sudo ufw reload
Step 4: Configure Reverse Proxy
- Remove default site:
sudo unlink /etc/nginx/sites-enabled/defaultCreate config:
sudo nano /etc/nginx/sites-available/reverse-proxy.confAdd server block (replace backend details):
server {

listen 80;

server_name your_domain.com your_raspberry_pi_ip;

location / {

proxy_pass http://your_backend_ip:backend_port/;

proxy_set_header Host $host;

proxy_set_header X-Real-IP $remote_addr;

proxy_set_header X-Forwarded-For $proxy_add_x_forwarded_for;

proxy_set_header X-Forwarded-Proto $scheme;

}

}
Enable and reload:
sudo ln -s /etc/nginx/sites-available/reverse-proxy.conf /etc/nginx/sites-enabled/

sudo nginx -t

sudo systemctl reload nginx
Step 5: Test
- Visit your Raspberry Pi’s IP or domain to confirm the backend content is served through NGINX.
Artifactory NGINX Proxy Setup: Configuration Made Easy
Setting Up Nginx as a Reverse Proxy
Step 1: Install NGINX
- Update package list:
sudo apt updateInstall NGINX:
sudo apt install nginx -yStep 2: Configure Reverse Proxy
- Create a new configuration file:
sudo nano /etc/nginx/sites-available/my_proxyAdd server block (replace placeholders with your info):
server {

listen 80;

server_name your_domain_or_ip;

location / {

proxy_pass http://internal_service_ip:port;

proxy_set_header Host $host;

proxy_set_header X-Real-IP $remote_addr;

proxy_set_header X-Forwarded-For $proxy_add_x_forwarded_for;

proxy_set_header X-Forwarded-Proto $scheme;

}

}
Step 3: Enable Configuration
sudo ln -s /etc/nginx/sites-available/my_proxy /etc/nginx/sites-enabled/

sudo rm /etc/nginx/sites-enabled/default
Step 4: Test and Reload NGINX
sudo nginx -t

sudo systemctl reload nginx
Step 5: Router & Optional SSL Setup
- Forward ports 80/443 to your Raspberry Pi for external access.
- Optional: Install Certbot for HTTPS:
sudo apt install certbot python-certbot-nginx

sudo certbot --nginx -d your_domain_name
Testing Your Reverse Proxy
Step 1: Check NGINX Status
- Make sure NGINX is running:
sudo systemctl status nginx- Look for active (running) in the output.
Step 2: Test Connectivity and Proxy
- Access your Raspberry Pi IP or domain in a browser or via curl:
curl http://your_raspberry_pi_ip_or_domain- Confirm that proxied services load correctly and headers like X-Forwarded-For are working.
Step 3: Verify Logs and SSL
- Check logs for errors:
/var/log/nginx/access.log

/var/log/nginx/error.log
If using SSL, ensure HTTPS works and the certificate is valid.
Setting Up NGINX Reverse Proxy with LDAP Authentication
[Need assistance with a different issue? Our team is available 24/7.]
Conclusion
Setting up an NGINX reverse proxy on a Raspberry Pi can significantly improve traffic management, security, and performance for your web services. By following this NGINX reverse proxy Raspberry Pi setup guide, you can efficiently route requests, protect backend servers, and ensure a smooth, reliable experience for users.
In brief, our Support Experts demonstrated how to fix the “554 5.7.1 : Relay access denied” error.


0 Comments