


Dynamic provisioning NFS Kubernetes simplifies storage management. Our NFS support team is ready to assist you.
Dynamic Provisioning NFS Kubernetes
Dynamic NFS storage provisioning in Kubernetes automatically sets up and manages NFS volumes for your applications. It makes storage management quicker, simpler, and more effective by eliminating the need for you to manually create Persistent Volumes (PVs) and link them to Persistent Volume Claims (PVCs).
How the NFS Provisioner Works
The first step in Kubernetes’ dynamic NFS storage provisioning is to set up an NFS server that has a shared folder that the cluster can access. Storage requests are listened to using a program such as nfs-subdir-external-provisioner. After that, a StorageClass is made, connecting the provisioner to information like the IP address and shared folder path of the NFS server.
This StorageClass is used by the application to construct a PersistentVolumeClaim (PVC) when storage is required. The storage becomes instantly accessible to the Pod after the provisioner recognizes the PVC, generates a corresponding PersistentVolume (PV) on the NFS server, and binds it to the PVC.
Prerequisites for Setup
Both the cluster and the NFS server must be ready before you can configure dynamic NFS storage in Kubernetes. Make sure that the cluster is operational, with a minimum of one master and one worker node, kubectl set up with administrator privileges, and nfs-common installed on each worker. Helm is an optional tool for facilitating the deployment of NFS clients. Install the NFS software on the NFS server, make sure the network is connected, open the necessary ports (such 2049), export and establish a shared directory with the right permissions, and have administrator access on both devices.
Check out our expert guide to learn how to install and configure Kubernetes on Ubuntu.
How to Install NFS server on Kubernetes
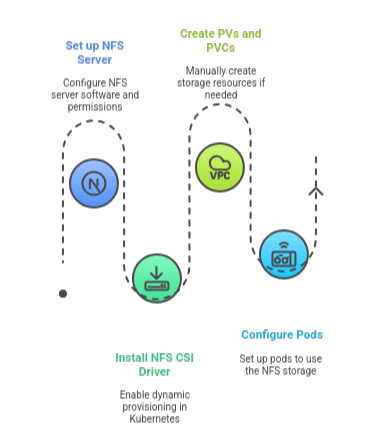
Step 1: Set up the NFS server software (nfs-utils for Red Hat/CentOS, nfs-kernel-server for Ubuntu/Debian) on a different computer. To enable client access, create a shared directory, configure /etc/exports, and provide the appropriate permissions. To implement the modifications, restart the NFS service.
Step 2: Install the NFS CSI driver to enable dynamic provisioning, which enables Kubernetes to generate and administer PVs and PVCs automatically.
Step 3: Create PVs pointing to the NFS share by hand if CSI is not being used. After that, make PVCs so that programs can connect to the storage and make requests.
Step 4: Set up your Kubernetes pods to utilize the PVCs so that your apps may access the NFS storage.
Discover how Kubernetes simplifies container orchestration on Ubuntu in our expert guide.
[Need assistance with a different issue? Our team is available 24/7.]
Conclusion
Dynamic provisioning NFS Kubernetes simplifies storage management by automatically creating and linking Persistent Volumes and Claims. Applications can immediately access storage by configuring Pods, installing the CSI driver, and setting up the NFS server. With this method, teams can concentrate on delivering and managing applications because it decreases human labor, avoids mistakes, and increases efficiency.
In brief, our Support Experts demonstrated how to fix the “554 5.7.1 : Relay access denied” error.


0 Comments