Wondering how to access VMFS datastore from Linux, windows, and ESXi? You’re at the right place.
Here at Bobcares, we have seen several such VMWare related queries as part of our Server Management Services for web hosts and online service providers.
Today we will take a look at how to access VMFS datastore.
How to access VMFS Datastore from Linux, Windows, and ESXi
Now let’s take a look at how our Support Engineers access the data stored on the VMFS database of the ESXi host.
If the ESXi host crashes, but the local disk (disks) of the server are still functional, then it is always possible to copy the virtual machine files (both data drives and configuration files) from VMFS datastore and run VM on a different server (even on VMware Workstation or Hyper-V). The main problem is that the common operating systems (Windows and Linux) by default do not recognize the partition with the VMFS file system, because they do not have a VMFS driver.
Let’s see the different ways of accessing data on the VMFS datastore.
How to Mount VMFS file system on Linux (Ubuntu)
First, we connect to a physical disk with the VMFS file system to the computer (server) with Ubuntu.
In order to access the data on the VMFS volume, we have to install a special third-party vmfs-tools package. This package allows accessing VMFS from non-ESXi hosts. It is possible to access data on this partition in read-only mode.
We run the below command to install the package.
#apt-get install vmfs-tools
Next, to install package dependencies, we run the below command.
#apt-get install vmfs-tools
After the package is installed, we need to create a mount point in which the VMFS partition will be mounted:
#mkdir /mnt/vmfs
The next step is to look into the partitions on the disks. Creates a number of service partitions when installed in addition to the partition for virtual machine files (VMFS partition).
If the ESXi version is 4 or earlier, or a VMFS storage has been updated from VMFS 3 to VMFS 5, and its size doesn’t exceed 2TB, then we can display the list of disks and partitions by executing below command.
#fdisk -l
As a result of the above command, we found VMFS partition is /dev/sdb3
Now we only have to mount a partition with the VMFS storage:
#vmfs-fuse /dev/sdb3 /mnt/vmfs
Then list the contents of the mounted partition:
#ls -all /mnt/vmfs
Now we see all the virtual machine files on the VMFS storage that is available in read-only mode. It means that we can now copy the directories and/or individual files of the necessary virtual machines to a separate drive and run them on another ESXi host.
Access VMFS Volume from Windows
In order to connect the VMFS volume and access virtual machine files from Windows, we’ll need a special Java driver – Open Source VMFS Driver. This driver requires Java version 6 or later. It allows mounting VMFS volumes in read-only mode.
- First, we download Open Source VMFS Driver (fvmfs_r95_dist.zip and unpack it to any directory (e.g., C:\vmfs).
- Next, we can check the operation of the java-application fvmfs.jar by running the below commands.
cd \vmfs

java -jar fvmfs.jar - Next, we determine the number of HDDs containing VMFS storage that is connected to the Windows computer. We can find the disk number in the Disk Management Console or using diskpart (in our example, the connected disk has the index 1 – Disk1. For fvmfs driver, this disk has the following name: \\.\PhysicalDrive1).
- Then we try to get information about this disk:
java -jar fvmfs.jar \\.\PhysicalDrive1 info - After that, we share this disk with WebDAV:
java -jar fvmfs.jar \\.\PhysicalDrive1 webdav - Then mount the shared disk:
net use * http://localhost:50080/vmfs - A new disk that contains VMFS datastore available for reading should appear in the system;
However, we don’t close the console window while working with files on the VMFS storage.
Mounting an existing VMFS Datastore on a new ESXi host
As we saw earlier in both of the above cases, third-party VMFS drivers for Linux and Windows do not allow working with VMFS 6.0. Therefore, the best way to access data on a VMFS partition of a failed server is to connect its disks to a new ESXi server.
The new ESXi host must correctly identify the attached VMFS datastore and then we will be able to access the files on it.
Here are the steps that we follow to connect an existing VMFS storage to a new ESXi host without formatting it:
- First, we connect to the new ESXi server using the vSphere Web Client;
- Next, we connect the drive to the new server and run Storage rescan;
- Then we go to the Configure >> Datastores section and select Create a new datastore item;
- After that, we select the storage type: Disk or LUN;
- In the list of available devices, we select the connected drive (LUN) with the VMFS storage;
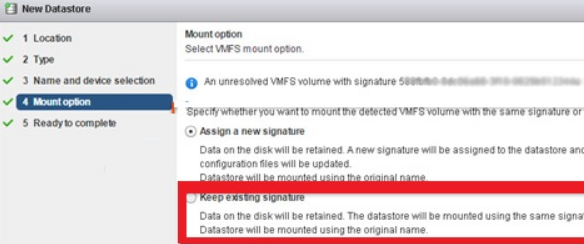
- Then we select the connection mode. Select Keep the existing signature item;

- We click the Finish button.
- We go to the host’s storage section. Here we select the connected storage. Its contents can be displayed by clicking on the
- Datastore browser button;
- Finally, now we can find the necessary vmx files, register them on the host, and immediately start the critical virtual machines.
[Need any further assistance in fixing VMWare queries? – We are here to help you]
Conclusion
Today, we saw how our Support Engineers how to access VMFS datastore from Linux, Windows, and ESXi.


0 Comments