


Quickly and securely Install Yeastar P-Series on OVH via CLI for efficient PBX setup. Our OVH Support team is ready to assist you.
Install Yeastar P-Series on OVH via CLI
Deploying Yeastar P-Series PBX on OVHcloud is fast and secure using the Yeastar Partner Portal. Generate your OVHcloud API key, authorize the portal, and configure your instance to have a fully functional PBX ready in no time. You can also choose CLI deployment for more control and customization.
-
- How to Install Yeastar PBX on OVHcloud via Yeastar Partner Portal
- Step 1: Prepare OVHcloud Resources
- Step 2: Start Deployment via Yeastar Partner Portal
- Step 3: Configure and Deploy Your Instance
- Step 4: Complete Post-Deployment Configuration
- Install Yeastar P-Series Software Edition from Partner Portal
- Post-Installation Steps for Yeastar P-Series Software Edition
- Access and Management of Yeastar P-Series PBX
How to Install Yeastar PBX on OVHcloud via Yeastar Partner Portal
Deploying Yeastar PBX on OVHcloud has never been easier when you use the Yeastar Partner Portal. By following this guide, you can quickly prepare resources, configure your instance, and complete post-deployment setup efficiently.
Step 1: Prepare OVHcloud Resources
To start, create a Public Cloud project in your OVHcloud account. This project will host your PBX deployment. Next, generate an API key in the OVHcloud API section. Ensure it has both read and write permissions for your project. Safely store this key, as you will need it later for integration with the Yeastar Partner Portal.
Step 2: Start Deployment via Yeastar Partner Portal
Log in to the Yeastar Partner Portal with your partner credentials. Navigate to the Deploy section or locate your purchased P-Series Software Edition under Products. Select OVHcloud as your cloud provider. Then, paste the API key you created to allow Yeastar Partner Portal to communicate securely with OVHcloud.
Easily manage and add DNS records through the OVH API step by step.
Step 3: Configure and Deploy Your Instance
Once authorized, configure the instance parameters such as CPU, memory, and storage. These settings should match your expected workload and customer requirements. Review all details carefully, including the OVHcloud project and instance specifications. Finally, click Deploy to initiate the automated installation process.
Step 4: Complete Post-Deployment Configuration
After deployment begins, monitor its progress directly in the Yeastar Partner Portal. When the deployment is complete, log in to your PBX instance using the provided credentials. Complete the initial setup using the PBX web interface, ensuring your system is ready for immediate use.
Troubleshoot and resolve the OVH Public Cloud project creation error effectively.
Install Yeastar P-Series Software Edition from Partner Portal
Deploying the Yeastar P-Series Software Edition is fast and secure using the Yeastar Partner Portal.
1: Access the portal and navigate to Products & Purchase to locate your P-Series Software Edition.
2: Click Install PBX and select your cloud provider, such as DigitalOcean, AWS, or OVHcloud.
3: Enter your cloud credentials or API key to authorize the portal for deployment.
4: Set the instance name, select project and region, choose instance type, and add an SSH key if needed.
5: Click Create and Install. Monitor the progress within the portal until deployment completes.
6: Use the provided public IP to log in to the PBX web portal and finish the setup.
Post-Installation Steps for Yeastar P-Series Software Edition
After successfully deploying the Yeastar P-Series Software Edition, there are a few essential steps to ensure your PBX system runs smoothly.
Access the PBX Web Portal
Use the public IP address provided during deployment to log in to the PBX web interface. This is where you will manage all system settings.
Complete Initial Setup
Follow the installation wizard to configure basic settings such as system time, network configuration, and admin credentials.
Activate Your PBX
Enter the activation code received during deployment to activate your system and unlock full features.
Set Up Extensions and Users
Create extensions, add users, and assign roles according to your organization’s needs.
Configure Security Settings
Update the root password, enable SSH access if required, and configure firewall rules to secure your PBX.
Test the System
Make test calls, verify call routing, and check voicemail functionality to ensure everything works correctly.
By following these post-installation steps, your Yeastar P-Series PBX will be fully operational and ready for daily use.
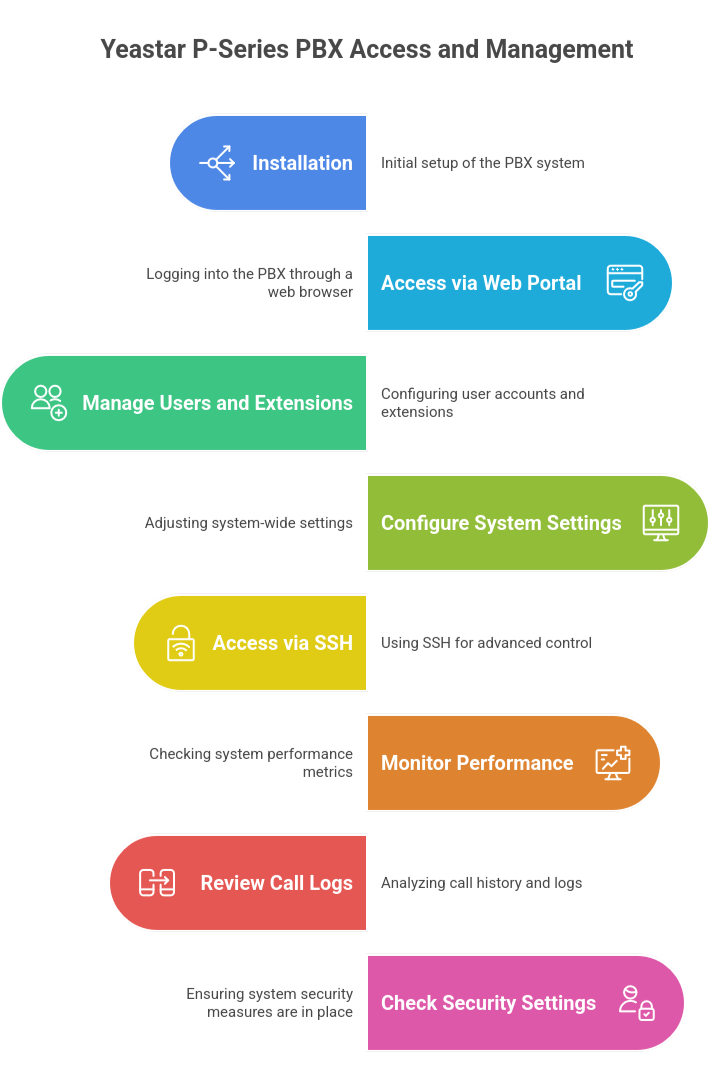
Access and Management of Yeastar P-Series PBX
After installation, access your PBX via its public IP through the web portal to manage users, extensions, and system settings. For advanced control, use SSH with your credentials. Regularly monitor performance, call logs, and security settings to ensure smooth and secure operations.
Step-by-step guide to resolve the IPv6 addition error in OVH efficiently.
[Need assistance with a different issue? Our team is available 24/7.]
Conclusion
Following these steps allows you to deploy Yeastar PBX on OVHcloud quickly and efficiently. By leveraging the Yeastar Partner Portal and OVHcloud integration, you can streamline your PBX setup while ensuring a secure and reliable deployment. For advanced users, you can also choose to Install Yeastar P-Series on OVH via CLI for more control and customization.
In brief, our Support Experts demonstrated how to fix the “554 5.7.1 : Relay access denied” error.


0 Comments