Let us look at how to Install WordPress on a Subdomain with Nginx. With the support of our Nginx Support services at Bobcares we can give you a complete guide on the setup.
Why Install WordPress on a Subdomain with Nginx?

Install WordPress on a Subdomain with Nginx
WordPress is a widely used self-hosted Content Management System (CMS) for powering blogs and general-purpose websites.
Creating a quick and dependable WordPress website necessitates the use of a trustworthy web server, such as Nginx, to provide all essential files requested by website visitors on a given domain.
This article demonstrates how to install WordPress on a subdomain and configure it to operate properly with the underlying architecture using Nginx as the web server and MySQL or MariaDB as the database server.
Requirements to Install WordPress on a Subdomain with Nginx
Before we begin, we need to have the following set up:
- Install a fresh Ubuntu 20.04 server with an LEMP stack, or deploy a Vultr One-Click LEMP server.
- Create a subdomain and point it to the server.
- Use sudo to connect to the server as a non-root user.
Setup the WordPress Database
To set up the database follow the steps givemn below:
- Firstly, Access the MySQL database server.
$ mysql -u root -p - Setup a new database
mysql> CREATE DATABASE wp; - Make a new database user with a strong password.
mysql> CREATE USER `wpuser`@`localhost` IDENTIFIED BY ‘Strong-Password’; - Grant full privileges to the user in the WordPress database.
mysql> GRANT ALL PRIVILEGES ON wp.* TO 'wpuser’@’localhost'; - MySQL privileges should be refreshed.
mysql> FLUSH PRIVILEGES - Exit the MySQL console.
mysql> EXIT
Install WordPress
Follow the steps given below:
- Create a new files directory in WordPress.
$ sudo mkdir /var/www/wp.example.com - Get the most recent WordPress release file.
$ wget http://wordpress.org/latest.tar.gz - Files should be extracted from the archive.
$ tar -xzf latest.tar.gz - Replace the extracted files in the WordPress directory.
$ sudo mv wordpress/* /var/www/wp.example.com - Give Nginx read and write access to the directory.
$ sudo chown -R www-data:www-data /var/www/wp.example.com
Configure Nginx
For the setting up the Nginx:
- Firstly, In the
/etc/nginx/sites-available</code >directory, create a new Nginx Server Block.
$ sudo touch /etc/nginx/sites-available/wp.example.com.conf - After that, edit the server block file using any text editor.
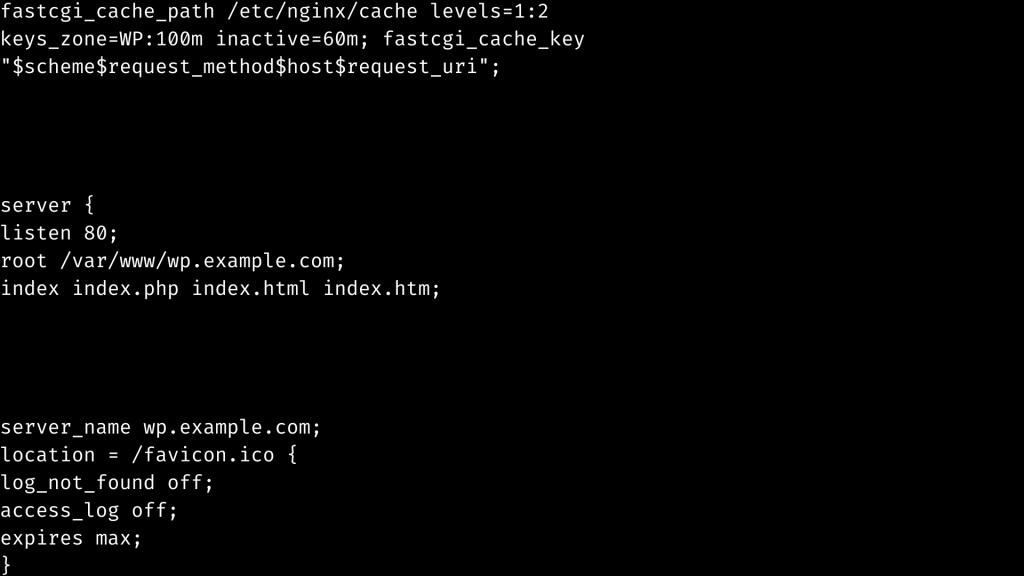
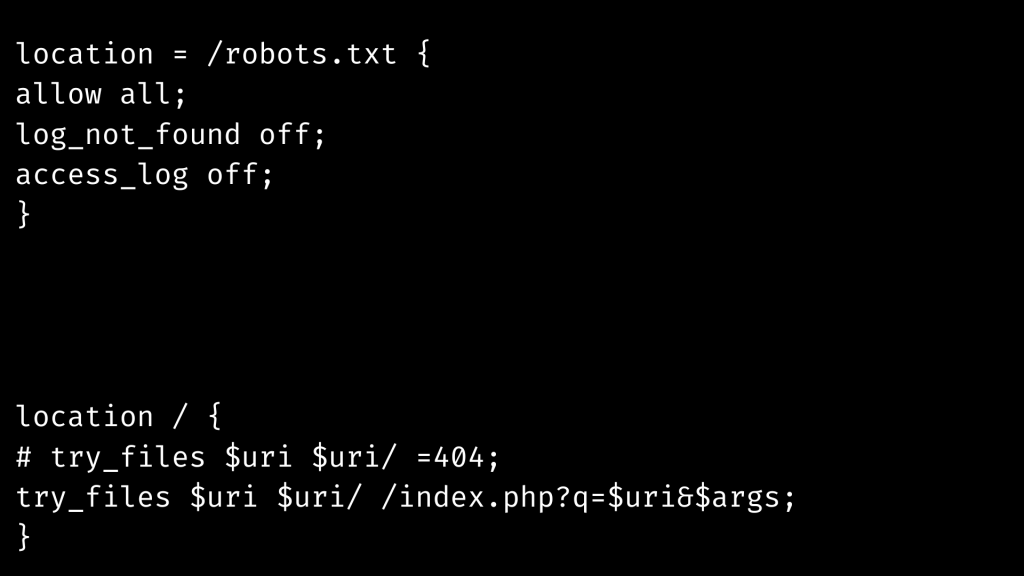
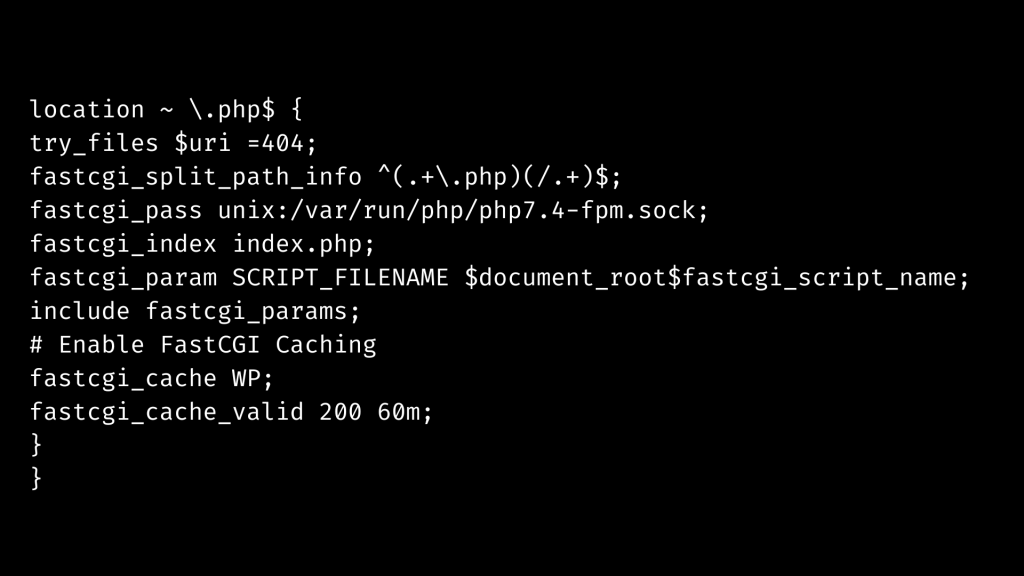
$ sudo nano /etc/nginx/sites-available/wp.example.com.conf - Copy and paste the configuration lines below into the file.


- Check for configuration issues in Nginx.
$ sudo nginx -t - Link the Nginx server block to the /etc/nginx/sites-enabled directory to activate it.
$ sudo ln -s /etc/nginx/sites-available/wp.example.com.conf /etc/nginx/sites-enabled/wp.example.com.conf - To make changes take effect, restart Nginx.
$ sudo systemctl nginx restart - Finaly, launch PHP-FPM to serve PHP files from WordPress.
$ sudo systemctl php7.4-fpm start
Security
Follow the steps given below:
- Firstly, enable HTTP and HTTPS ports to pass past the firewall.
- UFW on Debian-based systems:
$ sudo ufw allow 80/tcp

$ sudo ufw allow 443/tcp - FirewallD on RHEL-based systems:
$ sudo firewall-cmd --permanent --zone=public --add-service=http. $ sudo firewall-cmd --permanent --zone=public --add-service=https. - Install Certbot to provide HTTPS security to the WordPress site. On Debian-based machines:
$ sudo apt install certbot python3-certbot-nginx - After that, on RHEL-based systems type in the following:
$ sudo yum install certbot python3-certbot-nginx - Certbot may be used to obtain a free Let’s Encrypt SSL Certificate.
$ sudo certbot -d wp.example.com -d www.wp.example.com - Edit the Nginx server block file.
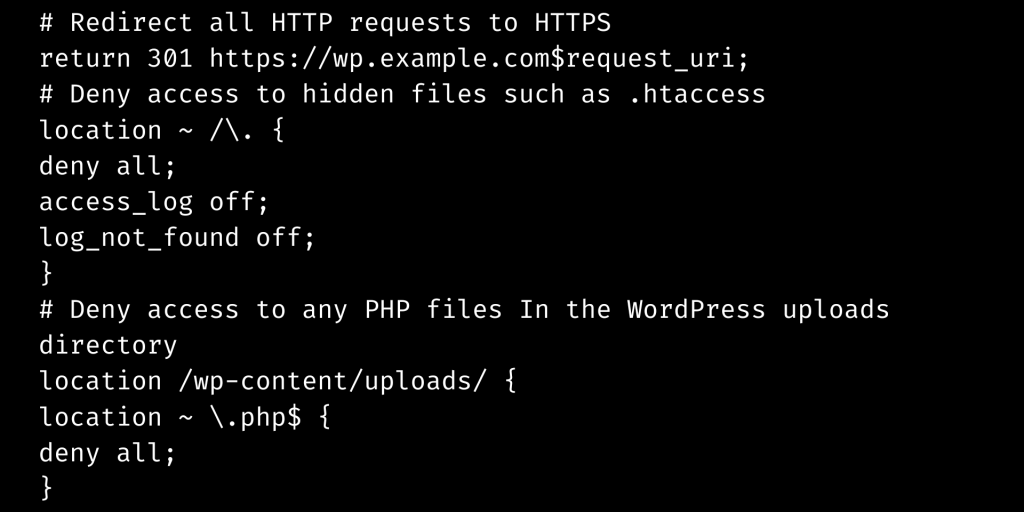
$ sudo nano /etc/nginx/sites-available/wp.example.com.conf - Finally, in the server section, add the following lines to redirect all HTTP queries to HTTPS and to limit access to important website files such as
and.php.htaccess.

Set up WordPress
Follow the steps given below to set up wordPress. This is the next big step to Install WordPress on a Subdomain with Nginx:
http://wp.example.com- To begin the WordPress installation process, click Get Started.
- After that, insert the previously prepared Database information.
- Enter the title of your WordPress website and create a new administrator account.
- Complete the setup and log in to the WordPress website.
- Go to Plugins in the WordPress administrator dashboard and select Add New Plugin.
- Enter the words Nginx Helper in the plugin search area, then download and install it on the WordPress website.
- After that, to fine-tune your WordPress website with Nginx, navigate to the WordPress Settings drop-down and choose the Nginx Helper plugin.
- Finally, activate Cache Purge to automatically clean FastCGI cache whenever new modifications are made to the website.
[Need assistance with similar queries? We are here to help]
Conclusion
To sum up we have now seen how to install WordPress on a Subdomain with Nginx. With the support of our Nginx support services at Bobcares, we have gone through the entire process.
PREVENT YOUR SERVER FROM CRASHING!
Never again lose customers to poor server speed! Let us help you.
Our server experts will monitor & maintain your server 24/7 so that it remains lightning fast and secure.


0 Comments