


Monitor Apache ActiveMQ with Nagios XI with ease with a little assistance from the experts at Bobcares.
At Bobcares, we offer solutions for every query, big and small, as a part of our Server Management Services.
Let’s take a look at how our Support Team is ready to help customers monitor Apache ActiveMQ with Nagios XI.
How to Monitor Apache ActiveMQ with Nagios XI
Apache ActiveMQ plugins come in handy while monitoring the Apache ActiveMQ server via Nagios XI. Today, our Support Team is here to help us set up Nagios XI in order to get access to up-to-date information on the number of objects on the ActiveMQ server queue.
Before we dive into the setup, here are a few prerequisites for the process:
- Apache ActiveMQ 5.14.3
- activemq_watch plugin
- Access to a user with access to read queues in queues.jsp
- NRPE agent set up on the Apache ActiveMQ server
- A network route from Nagios XI server to the Apache ActiveMQ server
Our Support Engineers are here to help you out with the perquisites so that you can easily monitor Apache ActiveMQ via Nagios XI.
How to install NRPE
Installing NRPE is essential since we will have to execute a plugin that helps with the monitoring process. If you do not have NRPE installed, head to this article for reference.
How to download activemq_watch plugin
After the NRPE installation, we will require Perl Packages before downloading the plugin.
- First, open a terminal session to the ActiveMQ server as root user and run the following command:
yum install -y perl-Switch perl-XML-Simple
- Then, download the plugin by running these commands:
cd /usr/local/nagios/libexec/
wget https://assets.nagios.com/downloads/nagiosxi/scripts/activemq_watch
chmod +x /usr/local/nagios/libexec/activemq_watch
- After that, edit the activemq_watch file and modify the following line by replacing admin:admin with the username:password of the ActiveMQ server:
my $page = get "http://admin:admin\@$address:$port/admin/xml/queues.jsp" or
die "Cannot get XML file: $!\n";;
- Next, we have to modify the file to reflect the port setup of the ActiveMQ server as well. By default, it is set to 8161.
my $port = "8161";
How to configure NRPE To execute activemq_watch plugin on ActiveMQ Server
According to our Support Techs, we have to edit the NRPE configuration file to add a definition for the plugin. This can be done by adding the following definition at the bottom of the file, in the list of commands:
command[activemq_watch]=/usr/local/nagios/libexec/activemq_watch $ARG1$
After adding the definition we have to save the file and exit. After that we have to restart xinetd to ensure the changes to the NRPE config are active with the following command:
systemctl restart xinetd
Our Support Engineers recommend checking the plugin from NagiosXI by executing the command below after establishing a terminal session to the Nagios XI server:
cd /usr/local/nagios/libexec/
./check_nrpe -H addr.of.activemq.server -c activemq_watch -a '-w 10 -c 20'
We have to replace add.of.activemq.server with the IP Address of the ActiveMQ server. This results in an output similar to the one below:
[root@xi-r7x-x64 ~]# cd /usr/local/nagios/libexece/ [root@xi-r7x-x64 libexece]# ./check_nrpe -H 10.25.8.4 -c activemq_watch a ‘w 10 -c 20’ OK – test holding: 0 msgs OK – nagios.test holding: 2 msgs OK – test2 holding: 0 msgs
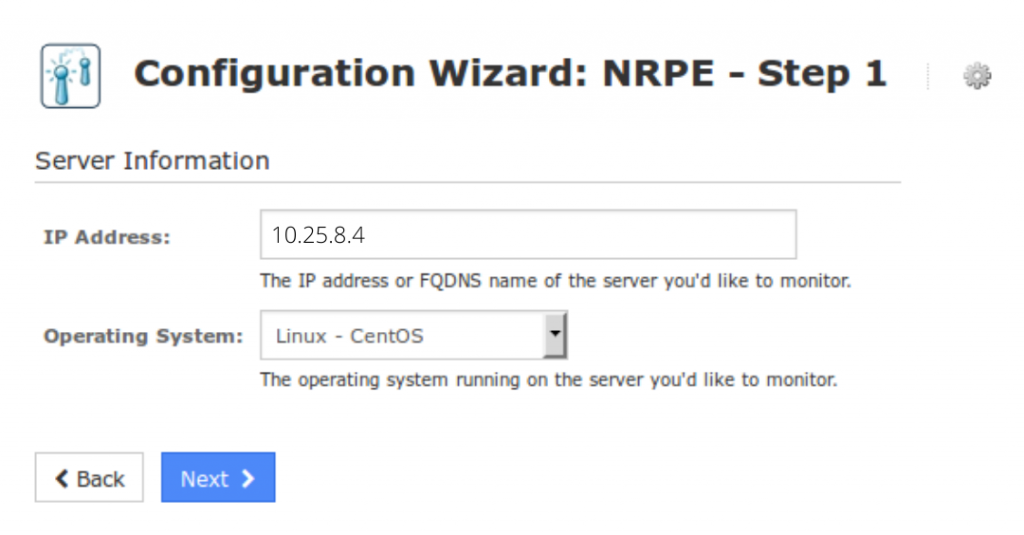
How to use NRPE Monitoring Wizard
This monitoring wizard is responsible for creating host and service objects. All we have to do is head to Configure > Run a configuring wizard and choose the NRPE wizard.
- Enter the address of the ActiveMQ server and select the Operating System before clicking Next.
- Then, configure the options for monitoring. For instance, make sure we enter a valid Host name.
- We can ignore NRPE Agent section since we have already installed it.
- Complete the wizard by selecting the required options in the remaining steps and clicking Finish.
After running the wizard, we can use the View status details for <ActiveMQ Server> option to view the new host and services we created.
This finally allows us to monitor Apache ActiveMQ in Nagios XI with ease.
[Looking for a solution to another query? We are just a click away.]
Conclusion
To sum up, our skilled Support Engineers at Bobcares demonstrated how to monitor Apache ActiveMQ with Nagios XI.
PREVENT YOUR SERVER FROM CRASHING!
Never again lose customers to poor server speed! Let us help you.
Our server experts will monitor & maintain your server 24/7 so that it remains lightning fast and secure.


0 Comments