Do you wanna setup moodle multi tenancy site? Then Iomad is the solution for it.
Iomad is an add-on for Moodle which takes all the features of Moodle.
Here at Bobcares, we often receive requests regarding Moodle as a part of our Server Management Services.
Today, let’s discuss Moodle and also see how our Support Engineers do it for our customers.
Moodle and Iomad
Moodle is a free and open-source learning management system.
The moodle multi-tenancy support requires an add-on Iomad.
Iomad provides the ability to create companies on top of Moodle. It provides spaces to create users and courses.
Upgrading Iomad from the Moodle repositories will break the multi tenancy of your site.
Let us discuss how our Support Engineers migrate it for our customers.
Moodle to Iomad Moodle multi tenancy migration
Recently one of our customers contacted us to migrate Moodle site to moodle multi-tenancy support. Thus, to achieve it an add-on Iomad is required.
Let us now discuss how our Support Engineers install Iomad in the server.
First, we create a database for Iomad installation. Then we create a user for the database.
Then we download the Iomad code from Github.
We move to the directory. Then we used the command to download and apply the latest stable patches
git pull origin IOMAD_32_STABLE
Now we create a directory under the webserver’s web directories. This directory stores the Iomad files. For that, we use the command
mkdir /var/www/moodledata
Then we give the required permission for the directory. For that, we use the command
chmod 755 /var/www/moodledata
Now we copy the file config-dist.php and rename the file as config.php.
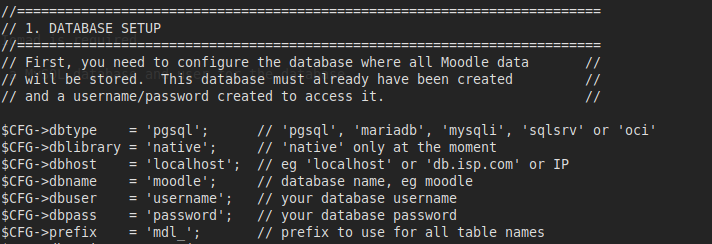
Then we edit the configuration file. We edit the following details in the configuration file.

Once the configuration file is edited we browse the Iomad site. Then the installation page appears. After that, we click on Continue.
Now the information about the moodle appears. Here, all the statuses are in green OK. So we click on Continue.
Now we fill the information with the account details. We enter the mail address, the username and the password for the Iomad.
Once the URL is loading without any error we make sure the Cron tasks are running properly. The cron files are present in the iomad directory.
After the installation is complete we migrate the contents from moodle site to moodle multi tenancy site.
We back up the existing Moodle installation. Then we export the database and copy the directories as well.
Now we stop the webserver service. Import the data to the newly created moodle multi tenancy site.
Once the process is complete we start the webserver service.
[Need assistance with moodle – We can help you do it]
Conclusion
In short, we have discussed iomad and multi-tenant. Also, we have also discussed how our Support Engineers how we migrate moodle to Iomad site.


Good day
I would like to install Moodle Multitenant on my Domain. I already had installed Moodle but I have removed it. I need the Multitenant option. Thank you kindly> kindly send me a Quotation.
Regards
Dominic
Hello Dominic,
We’ll be happy to talk to you on chat (click on the icon at right-bottom).