Want to Move Exchange Mailboxes to Another Database? We can help you.
With an Exchange server, we can move user mailboxes between databases on the same server or between remote mailbox servers.
As part of our Server Management services, we assist our customers with several Exchange Server queries.
Today, let us see how to move mailboxes in Exchange Server using the Exchange Admin Center (EAC) and PowerShell.
Move Exchange Mailboxes to Another Database
We cannot reduce the mailbox database size on a disk if we move or delete a mailbox. Rather, it frees space in the database (white space).
We can use this free space to store new mailbox items for other users in the same database.
In order to reduce the size of the Exchange database, we have to either defragment it offline or recreate it.
We create an Exchange move request to move a mailbox from a database to another. There are three types of move requests:
- A local move is a local request to move a mailbox in the same forest
- Cross-forest enterprise move moves mailboxes between different Active Directory forests
- Remote mailbox moves used in hybrid deployment to move mailboxes in hybrid configurations.
Move Mailboxes Using Exchange Admin Center (EAC)
- Initially, open the EAC, go to the Recipients >> Migrations.
- Click + and select Move to a different database.
- Then we select the user mailboxes to move.
We specify the list of mailboxes to migrate in a CSV file and upload it to the EAC. - Then we specify a target mailbox database to move mailboxes to.
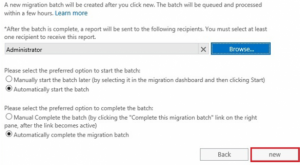
- Then we select if we want to start immediately or later and specify the mailbox to deliver a report.

Move Exchange Mailboxes with the New-MoveRequest PowerShell Cmdlet
To get the mailbox database that stores the user’s mailbox open the Exchange Management Shell (EMS) and run:
Get-Mailbox bob| Format-List Database
For instance, suppose the user’s mailbox is in the database named DB01. We use the New-MoveRequest cmdlet to create a local request to move a mailbox.
For example,
New-MoveRequest -Identity bob -TargetDatabase “DB02” –BadItemLimit 10
Here, the cmdlet returns the mailbox and archive sizes and a message that the move request has been queued.
On the other hand, to move all mailboxes to another database, we run:
Get-Mailbox -Database DB01 -ResultSize Unlimited | New-MoveRequest -TargetDatabase DB02
We should use the Arbitration option to move system mailboxes:
Get-Mailbox -Database DB01 -Arbitration | New-MoveRequest -TargetDatabase DB02
We can change mailbox migration settings in the configuration file MSExchangeMailboxReplication.exe.config.
For example, we can increase the number of simultaneous move request operations for a mailbox database or a mailbox server.
The time to move a mailbox depends on the mailbox size and the location of the target server. We can use the Get-MoveRequestStatistics cmdlet to track the mailbox migration status in %.
Get-MoveRequestStatistics -Identity bob
To display the status of all mailbox move requests in the organization, we run:
Get-MoveRequest | Get-MoveRequestStatistics
Once we are done with the migration, the PercentComplete value reaches 100.
Then we can display statistics on pending move request transfers:
Get-MoveRequest | where {$_.status -ne “completed”} | Get-MoveRequestStatistics | ft -a displayname,status*,percent
The mailboxes we move or queue can display via:
Get-MoveRequest -movestatus inprogress
Get-MoveRequest -movestatus queued
If we come across an error during the mailbox migration, we can display it using:
Get-MoveRequest bob | Get-MoveRequestStatistics | fl *failure*, message
More details about mailbox migration errors can be found at:
Get-MoveRequest -resultsize unlimited | Where-Object {$_.status -like “failed”} | Get-MoveRequestStatistics -IncludeReport | select DisplayName, Message, FailureType, FailureSide, FailureTimeStamp, *bad*, *large*, Report, Identity | fl
To cancel a mailbox move, run:
Remove-MoveRequest -Identity bob
Eventually, to remove successfully completed move requests, we run:
Get-MoveRequest -MoveStatus Completed | Remove-MoveRequest
Batch Mailbox Migration in Exchange Server
A more convenient option to track mailbox migration is the –BatchName option.
For instance, to move all mailboxes from a mailbox database to another in batch mode, we run:
Get-Mailbox -Database RO-DB01 | New-MoveRequest -TargetDatabase RO-DB02 -BatchName RODB01toRoDB02Move20210422
Then to get a migration status, we specify the batch name:
Get-MoveRequest -BatchName RODB01toRoDB02Move20210422| Get-MoveRequestStatistics
This ensures a successful migration.
Similarly to suspend a batch mailbox migration, we run:
Get-MoveRequest | ? {$_.Batchname –like “*RODB01toRoDB02Move20210422”}|Set-MoveRequest –SuspendWhenReadytoCompleate
Or to resume the migration, we run:
Get-MoveRequest | ? {$_.Batchname –like “*RODB01toRoDB02Move20210422”|Resume-MoveRequest
In Exchange Server 2013, 2016, 2019, and Exchange Online, we can move multiple mailboxes in a batch using the New-MigrationBatch.
To do so, we make a list of mailboxes to migrate in a CSV file and run:
New-MigrationBatch -Local -AutoStart -AutoComplete -Name RODB01Move20210422 -CSVData ([System.IO.File]::ReadAllBytes(“C:\PS\RODB01Move20210422.csv”)) -TargetDatabases RO-DB03 -BadItemLimit 10
The PrimaryOnly option is to move only the primary mailbox and to move an archive mailbox, we use ArchiveOnly.
[Need help with the resolution. We are here for you]
Conclusion
In short, today we saw how our Support Techs move Exchange Mailboxes to Another Database.


0 Comments