


Do you want to configure SSL in OpenLiteSpeed to secure your website? We can help you.
Setting up SSL on the website ensures a secure connection between the server and the browser.
At Bobcares, customers approach us to configure SSL in OpenLiteSpeed, as a part of our Server Management Services.
Today, we’ll see how our Support Engineers configure SSL for OpenLiteSpeed.
Need for configuring SSL in OpenLiteSpeed
OpenLiteSpeed is the open-source edition of the LiteSpeed webserver. It is a powerful cache engine. It comes with an admin GUI that can be accessed via the browser.
Usually, we recommend OpenLiteSpeed for individual websites that don’t update often. In OpenLiteSpeed, to load a new .htaccess file we must restart the web server every time. This can be tedious if the website undergoes frequent changes.
Whereas a LiteSpeed server autodetects the changes in the .htaccess and restarts the server when needed. So choosing the webserver will purely depend on the customer requirement.
In general, securing the webserver is of at most importance today. This is because users share their confidential details over the web during transactions. So it is the responsibility of the website owner to provide trust to the users.
Setting up an SSL certificate is the best way to secure websites. SSL certificates are data files that bind the cryptographic key to organizational identity.
By installing SSL certificates in the webserver we activate the HTTPS protocol which secures the connection between browser and web server.
Now let’s see how our Support Engineers configures SSL in OpenLiteSpeed in Ubuntu 18.04.
How we configure SSL in OpenLiteSpeed?
For configuring SSL in a webserver, firstly we need a private key and SSL certificate from a certificate issuer. This can be purchased from SSL providers for a specific cost, or use certificates from free SSL providers like Lets Encrypt.
Obtaining certificates
Here are the steps to obtain a private key and certificate from Let’s Encrypt. Here we use Let’s Encrypt, as it is a free automated open certificate provider. So to install certbot in Ubuntu, we use the commands,
apt update
apt install software-properties-common
add-apt-repository universe
add-apt-repository ppa:certbot/certbot
apt update
apt install certbot
Next, we need to obtain the certificate. For this we use,
certbot certonly --webroot -w <document root of the domain> -d <domain.com>
It places the files in the webroot directory. And it will ask for several details like email address, agreement towards the terms and services, etc. Now we have the certificates.
In the case of paid SSL, we get the certificates in a compressed format.
Next, let’s see how our Support Engineers configure SSL in the OpenLiteSpeed admin interface.
Configuring OpenLiteSpeed for SSL
Since OpenLiteSpeed has an admin web interface it is easier to configure SSL. And the steps we use are,
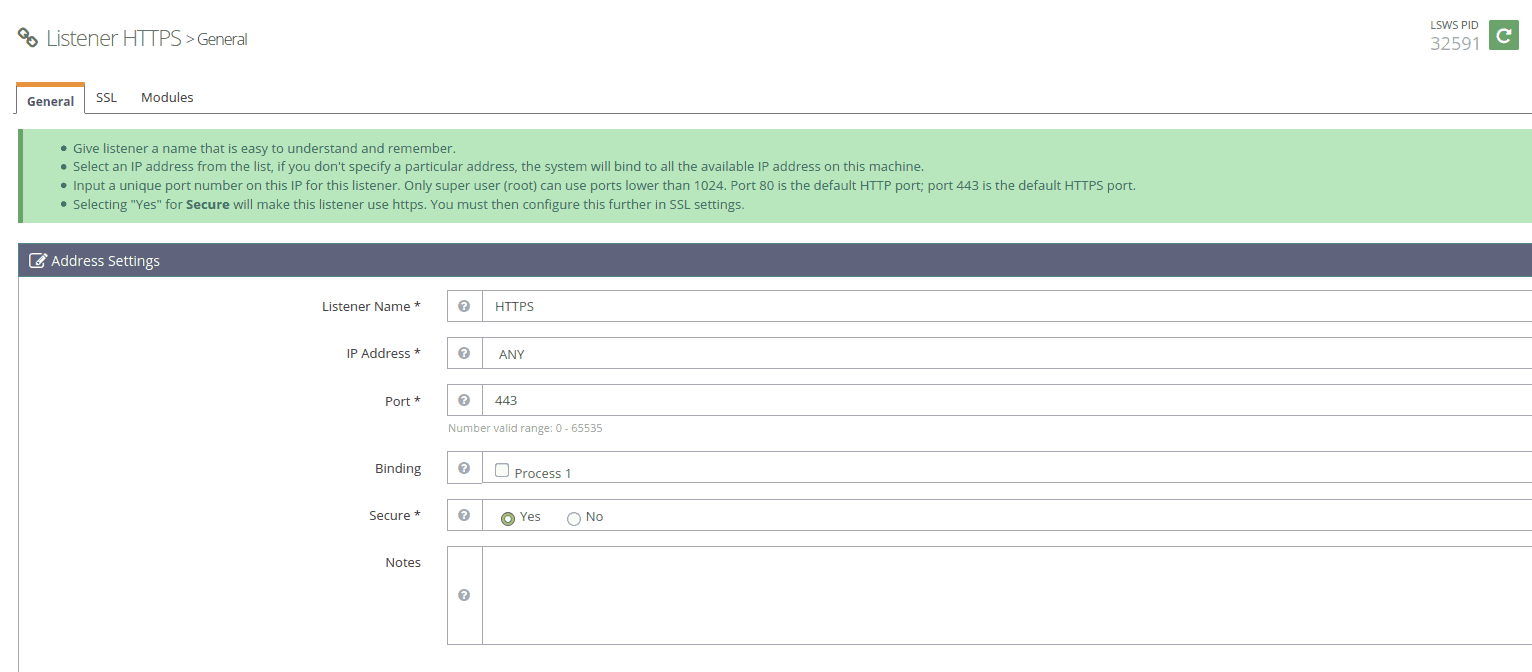
1. First, navigate to Listeners and add an HTTPS listener. Click the Add button at the top right and enter the details like Listener name, IP Address, Port, Secure, etc. And the setting appears as,
2. Next, we need to specify the key and certificate. For this navigate as Listeners >> HTTPS >> SSL. Now Edit SSL Private Key & Certificate section. Later add the Private key file location, Certificate file location, and enable Chained Certificate.
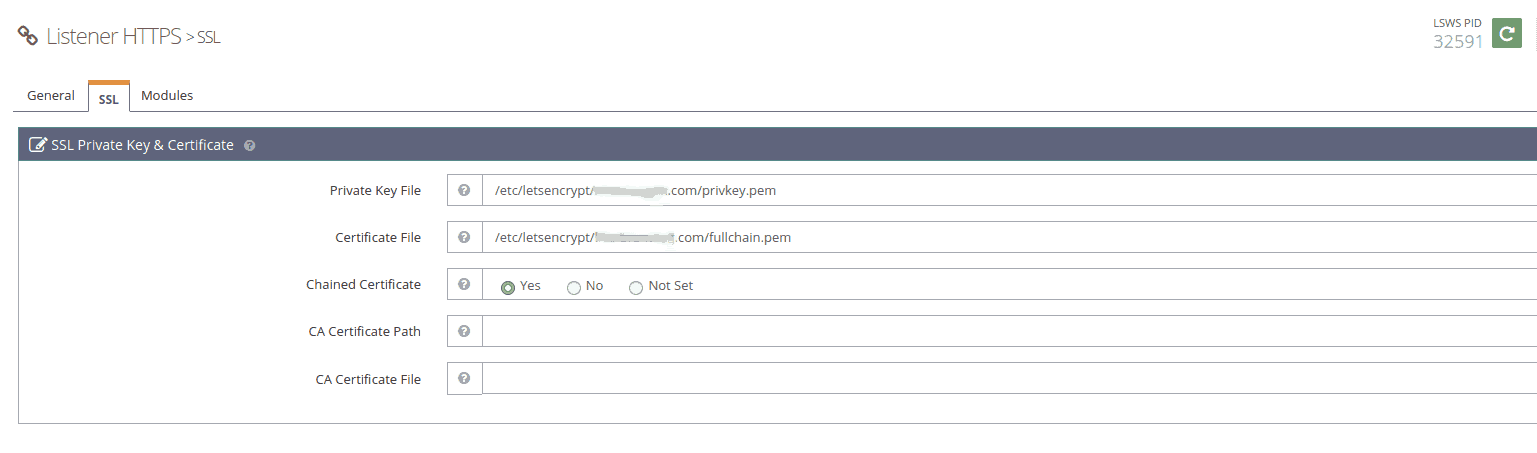
Also, Edit the SSL Protocol section to select the Protocol Version.
3. Now we need to map the Virtual Hosts to the SSL Listener. For this navigate as Listeners >> General. Select the Add button in the Virtual Host Mappings section. Here, choose the Virtual Host from the drop-down and add the Domains required.

Later we restart the webserver via the panel. The green button at the top left can do a Graceful Restart.
4. Finally, check if the SSL is working. For this, we access the domain via any browser and look for a lock-pad near the URL. And while clicking it shows the message Connection is secure.
[Still, having trouble in configuring SSL in OpenLiteSpeed? – We can help you.]
Conclusion
So far we saw the steps that our Support Engineers use to configure SSL in OpenLiteSpeed webserver. Setting up an SSL certificate enables HTTPS protocol that secures the connection between a web server and a browser.


0 Comments