


CSF messenger helps us to alert the users if the firewall blocks their IP address. Two different methods are available to setup CSF Messenger.
As a part of our Server Management Services, we help our Customers with firewall related requests regularly.
Let us today discuss the steps to setup CSF messenger.
Why do we need to setup CSF Messenger?
For a system protected by the CSF firewall and being used by a number of clients, it is possible for the clients to get locked out due to a number of reasons.
IP block can make the websites and email services unavailable for the user. Without a proper warning message, users often misinterpret it as a server-wide issue and blame the provider.
Thus it is important to provide a proper warning message to the user if they are blocked in the firewall.
The CSF messenger helps us with this task. CSF also provides the user with the blocked IP address, so that they can contact the server owner or administrator to have the IP unblocked.
A sample warning message generated by CSF messenger looks like:

ReCaptcha
An additional option with the CSF messenger is the reCAPTCHA option.
The reCAPTCHA functionality is a CAPTCHA-like method that helps to verify that the computer user is a human being. If the user successfully finishes the captcha challenge, they can unblock themselves.
A point to be noted here is that if the firewall blocks a malicious person, they will also have the option to unblock them by completing the captcha challenge.
How to setup CSF Messenger?
Here, we discuss two different methods to implement the CSF messenger. First, we will discuss the general command-line method to implement CSF Messenger. We will also discuss the method to implement it from the WHM interface.
Implementation via Command line on a server
A one-line command to implement CSF Messenger from the command line is given below:
root@host:~# cp /etc/csf/csf.conf{,.backup} && csf -u && sed -i 's/MESSENGER = "0"/MESSENGER = "1"/g' /etc/csf/csf.conf ; sed -i 's/MESSENGERV2 = "0"/MESSENGERV2 = "1"/g' /etc/csf/csf.conf ; sed -i 's/MESSENGER_HTTPS_IN = ""/MESSENGER_HTTPS_IN = "443"/g' /etc/csf/csf.conf ; useradd csf -s /bin/false ; csf -raCopy Code
This command will:
- Backup CSF’s configuration file
- Update CSF to the latest version
- Make the necessary configuration file changes
- Restart the CSF services to enable the messenger feature
This will enable the CSF messenger feature.
Implementation via the WHM interface.
In the Terminal emulated page, type the following command on the command line and then press enter.
root@host:~# useradd csf -s /bin/falseCopy Code
Next, to get to the CSF configuration settings page in WHM, select the “Plugins” category, and then click on “ConfigServer Security & Firewall”. After that, click on the CSF tab, and then click on the “Firewall Configuration” button.

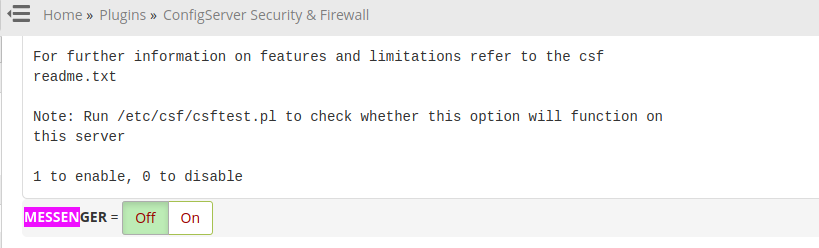
At the top of the Firewall Configuration page, click on the selection drop-down menu, scroll to the bottom and click on “Messenger Service”, then change the value from “OFF” to “ON” for the option MESSENGER =
Finally, scroll all the way down to the end of the page and click on the “Change” button.
Lastly, click on the “Restart csf+lfd” button to restart the CSF service to implement the changes.
Add reCAPTCHA option
To add an unban option for the client themselves we may need to add the ReCaptcha option.
First, we need to create the ReCaptcha keys from https://www.google.com/recaptcha/intro/index.html.
Make sure to uncheck the option ‘Domain Name Validation’ there.
Once we have created the ReCaptcha, enter the site key and secure key in the below section on CSF configuration to have it implemented.
RECAPTCHA_SITEKEY = “add the site key here”

RECAPTCHA_SECRET = “add secure key here”Copy Code
[Need any further assistance to setup CSF Messenger? – We’re available 24*7]
Conclusion
In short, the CSF Messenger option allows us to notify the users when they get blocked in the firewall. Today, we saw how our Support Engineers set up CSF Messenger.

0 Comments