


Quick setup: step by step guide – ssh user on ec2 instance on aws tutorial steps. Our AWS Support team is ready to assist you.
Step-by-Step Guide: Add an SSH User on an EC2 Instance in AWS
AWS’s Elastic Compute Cloud (EC2) solution includes cloud-based virtual servers that are scalable. You pay only for the resources you use, and you can select the operating system, CPU, RAM, and storage that you require. EC2 is an affordable way to run apps without having to worry about managing actual hardware because of its built-in flexibility, interaction with other AWS services, and robust security measures.
What is an EC2 Instance?
An Amazon Web Services (AWS) virtual server known as an EC2 instance enables you to execute apps in the cloud without having to worry about real hardware. You can choose the operating system, memory, CPU, and storage that best suit your needs.
Because EC2 is scalable and flexible, you may pay for only the resources you use and scale up or down at any moment. In addition to being compatible with Windows and Linux, it integrates with AWS features like load balancing, storage, and auto scaling. Because of this, EC2 is a safe and affordable choice for companies and developers.
Prerequisites
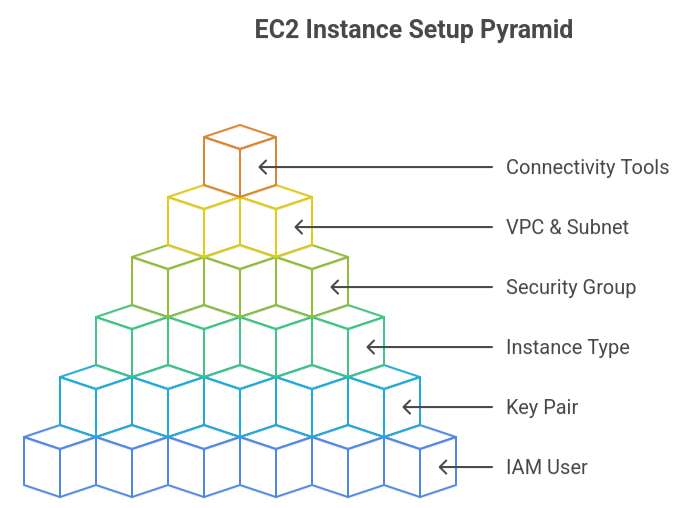
An IAM user with the necessary permissions to create and manage instances and an active AWS account are prerequisites for starting and connecting to an Amazon EC2 instance. Secure access requires a key pair, whether via RDP for Windows or SSH for Linux. Additionally, you must select an instance type that fits the CPU, memory, and networking needs of your workload, as well as an Amazon Machine Image (AMI) that supplies the operating system and software.
To regulate incoming and outgoing traffic, a security group must be set up. For example, SSH on port 22 or RDP on port 3389 must be allowed. Your instance must run within a VPC and subnet, and you may allocate a public or Elastic IP if internet connectivity is required. Furthermore, to create a secure connection to your instance, you will require the appropriate connectivity tools, such as an RDP or SSH client.
Generate a Key Pair from AWS Console
- Create an account in the AWS Management Console.
- The EC2 service can be accessed via the Services menu.
- Choose Key Pairs from the Network & Security on the left menu.
- Click “Create key pair.”
- Enter a clear name for the key pair (project-prod-key, for instance).
- Select the type of key pair to use:
- RSA (widely compatible) or ED25519 (condensed and contemporary).
- Select the file format for the private key:
- .pem supports Windows 10/11 OpenSSH, Linux, and macOS.
- .ppk for Windows PuTTY.
- The private key file is downloaded by your browser when you click Create key pair.
- You can’t download the file again, so keep it in a safe place.
- (macOS/Linux) Establish stringent permissions:
chmod 400 your-key.pem- (Optional) Print the public key if needed:
ssh-keygen -y -f your-key.pemWant to create an AMI from a snapshot using AWS CLI? Follow our step by step guide.
Fix Key Pair Permission Errors
On Linux/macOS
- Restrict private key file permissions:
chmod 400 /path/to/your/private_key.pem(Owner can only read, others have no access)
2. Secure the .ssh directory:
chmod 700 ~/.ssh(Only owner can read, write, and execute)
- Secure the authorized_keys file on the server:
chmod 600 ~/.ssh/authorized_keys(Owner can read and write, others have no access)
On Windows
- Find the file containing your private key (.pem or.ppk).
- Use the right-click menu to choose Properties.
- Select the Security tab.
- Go to the Advanced options.
- Assign the owner role to your account.
- Eliminate all inherited permissions and turn off inheritance.
- Give read-only permissions and add your user account.
- Close the window after applying the changes.
Create a User on EC2 Instance
- Connect to your EC2 instance
Use SSH with the default user (like ec2-user on Amazon Linux) and the private key. - Create a new user
sudo adduser new_user_nameFor Ubuntu, you may need:
sudo adduser --disabled-password new_user_name- Switch to the new user
sudo su - new_user_name- Set up the .ssh directory
mkdir .ssh

chmod 700 .ssh- Create the authorized_keys file
touch .ssh/authorized_keys

chmod 600 .ssh/authorized_keys- Add the public key for the new user
- Generate an SSH key pair locally with ssh-keygen if you don’t already have one.
- Copy the public key from your local machine (~/.ssh/id_rsa.pub).
- Paste it into the authorized_keys file:
echo "your_public_key_string" >> .ssh/authorized_keys- Exit the new user session
exit- Verify SSH access
From your local machine, connect using:
ssh -i /path/to/your/private_key.pem new_user_name@your_ec2_public_ipBitnami WordPress AWS AMI explained with key tips and usage.
Add SSH Key to EC2 Instance
During Launch
- Create a key pair in EC2 Key Pairs.
- Download private key (.pem or .ppk).
- Launch instance and select the key pair.
- Connect with:
chmod 400 your-key.pem

ssh -i your-key.pem ec2-user@your-ip
Existing Instance
- Generate a new key pair.
ssh-keygen -t rsa -b 4096 -f ~/.ssh/new_key- Copy the public key to the instance.
scp -i existing.pem ~/.ssh/new_key.pub ec2-user@ip:~/.ssh/- Add it to authorized_keys.
cat ~/.ssh/new_key.pub >> ~/.ssh/authorized_keys

chmod 600 ~/.ssh/authorized_keys- Connect using the new key.
Add User to Sudoers Group (Optional)
Adding a user to the sudoers group allows them to run commands with root privileges using sudo. This is useful for granting administrative access without logging in as root.
Method 1: Add to sudo group
- Open the terminal.
- Run the command:
sudo usermod -aG sudo username- Verify with:
groups username- Log out and log back in for changes to take effect.
Method 2: Edit sudoers file
- Open the file with:
sudo visudo- Add this line under user privileges:
username ALL=(ALL:ALL) ALL- Save and exit (CTRL+X, Y, Enter in Nano or :wq in Vim).
Learn how to disable TLS 1.0 on your AWS Load Balancer with our clear step by step guide.
[Need assistance with a different issue? Our team is available 24/7.]
Conclusion
AWS’s Elastic Compute Cloud (EC2) provides scalable, cost effective and secure virtual servers for running applications without physical hardware. This step by step guide ssh user on ec2 instance on aws helps you set up secure access easily.
In brief, our Support Experts demonstrated how to fix the “554 5.7.1 : Relay access denied” error.


0 Comments