Confused on how to add a domain in Plesk Control Panel? We can help you with it.
The Plesk Control Panel allows us to add domains, subdomains, email accounts, etc.
At Bobcares, we often get requests related to the Plesk Control Panel, as a part of our Server Management Services.
Today, let’s see how our Support Engineers quickly add a domain in Plesk.
How to add a domain in Plesk Control Panel?
Plesk is a popular control panel that helps to create new websites, e-mail accounts, DNS entries and so on through a web-based interface. We often get requests from our customers regarding the exact steps to add a domain in Plesk.
Making a domain work from the Plesk server involves multiple stages. Let’s check each of them.
Identify and Register domain
One of the primary steps in adding a domain is identifying the name for the website. After choosing the name, the domain requires registration.
Hosting providers that provide domain registration readily allows choosing the selected website name. And the Plesk Obsidian version shows this option as “You can register a new domain name at Services portal.”
Only after successful registration, the website will be accessible via the internet.
Add the domain in Plesk
Now its time to add the domain in the Plesk Control Panel. The exact steps differ based on the version of Plesk.
To add a new domain in Plesk Obsidian, we follow the below steps.
1. Initially, we log in to Plesk.
2. Then click Websites & Domains in the left sidebar.

3. Then we click the Add Domain option.

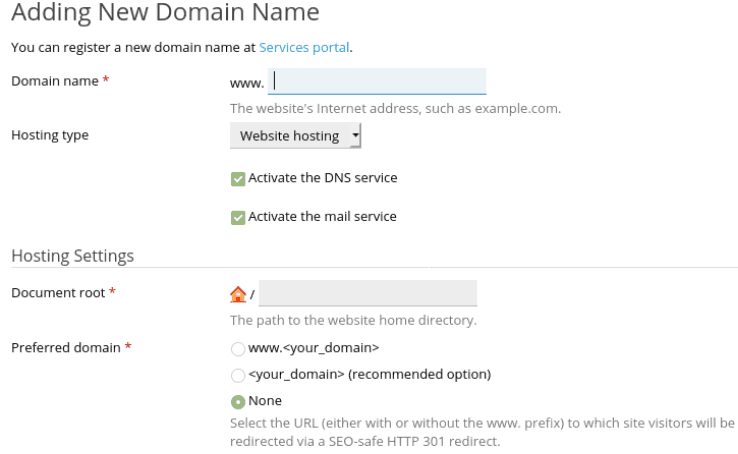
4. In the Domain name text box, we type the domain name of the site.
5. Next, we select the hosting type. There are three options available for the hosting type.
- Website Hosting: It enables to host a website and email services.
- Forwarding: It enables to redirect traffic from one site to another site.
- No hosting: It enables to host only the DNS and e-mail services. It does not allow to host a website.
We want to host a website so we select the Hosting Type as Website Hosting.
6. We confirm that the Activate the DNS service and Activate the mail service checkboxes are selected. If we don’t want mail service for this domain, then uncheck the checkbox. In general, this applies to domains that use separate mail services like Gmail, Hotmail, or even own mail servers.
7. There are two options available under the Hosting Settings.
- Document root
- Preferred domain
The website files are actually stored in the Document root directory and the Preferred domain option used to redirect a website.
Plesk automatically fills the details in the Document root and Preferred domain options.
8. Finally, we click Ok.
That completes the domain addition in Plesk.
Plesk Add Domain – Common errors and Fixes
Recently, one of our customers approached us saying that they are not able to see the Add Domain option in Plesk. Our Support Engineers checked in detail and found that it occurred due to option Domains management disabled in the settings.
To fix it, we enabled the option with these steps.
1. Firstly we clicked the Customize option on the right side.
2. Then we clicked on the Permissions tab and then Show more available permissions. There we enabled the Domains management option.
3. After that, we switched to the Resources tab.
In the Resources tab, we made sure that enough resources are allocated to Domains. If resources limits for Domains have reached the limit, we increase the limit and apply the changes.
That made the Add Domain option available in Plesk.
[Need assistance to Add Domain in Plesk Control Panel?- We’re available 24/7.]
Conclusion
In short, we have discussed the steps to add a domain in Plesk Control Panel. Also, we saw how our Support Engineers fix the Add Domain option missing in Plesk.


0 Comments