Let’s Encrypt GCP load balancer provide an option to setup an earlier created certificate with Google Cloud shell to the load balancer frontend.
Bobcares responds to all inquiries, large and small, as part of our GCP support service.
Let’s look at how to set up HTTPs load balancing with a Letsencrypt certificate in more detail.
Let’s Encrypt GCP load balancer
To use Google Cloud Platform’s HTTPs load balancer, we must first create an SSL certificate. Letsencrypt is a free tool for creating SSL certificates, even though it is only good for three months.
Create a certificate with Letsencrypt.
The following are the requirements for creating a Letsencrypt certificate.
- A domain name
- Access the application using the domain name.
The commands for creating an SSL certificate must be run on the server for which the certificate is being installed, or we must have access to the application deployed on the domain for which the SSL certificate is being requested. We don’t have a separate application to run commands required for generating a Letsencrypt certificate, so it just gives us an IP address.
Certbot
Certbot is a programme that generates certificates. We can install Certbot on MAC OS X using the brew package manager with the steps below.
- Firstly, install certbot.
brew install certbot - Once we install the certbot, run the command below to request a certificate generation.
sudo certbot certonly --manual -d www.domainname.comReplace www.domainname.com with our domain name. It will walk us through the process and ask for information such as our email address, organisation name, and city. The email address will be used to send notifications about domain expiration notices.
- Then, certbot will attempt to verify the domain by providing us with a unique URL and expecting a unique response to ensure that the domain is ours.
- Finally, at the end of the process we will have an access to following files:- fullchain.pem, cert.pem, chain.pem, and private.pem.
These files will be used in the following steps on the Google Cloud Platform console to configure SSL certificate resources.
Configure on Google Cloud Console.
- Firstly, go to Cloud Console and select the Google Cloud Load Balancer option.
- Then go to the Google cloud console’s load balancer page.
- Choose a load balancer from the list on which the SSL certificate will be installed.
- Then go to the load balancer’s edit page.
- Click
andAdd Frontend IP
in the Frontend configuration section. Fill in the requested fields with the information listed below.Port - Then, select
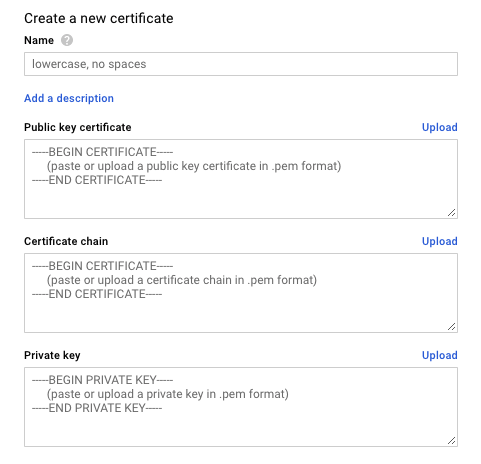
from the certificate dropdown menu. A dialogue will appear, as shown below.Create a new certificate
- Finally, input the values Name, Public key certificate, Certificate chain, and Private key.
- Then, click the
button. Then an SSL certificate resource will be validated and created. Update the Load Balancer settings. The effect will take 5 to 10 minutes to complete.Create - Enter an IP address in the browser to see if HTTPS access to our site works.
[Looking for a solution to another query? We are just a click away.]
Conclusion
To sum up, our Support team went over how to set up HTTPs load balancing with a Let’s Encrypt certificate in great detail.
PREVENT YOUR SERVER FROM CRASHING!
Never again lose customers to poor server speed! Let us help you.
Our server experts will monitor & maintain your server 24/7 so that it remains lightning fast and secure.


can we automate this process by using certbot in cron and using api to pause the new certificate
Yes