By default, when an LXC container is created in Proxmox, it is assigned a single static IP to access it. Many a times, users require additional IPs in their containers.
Multiple IP addresses are required in cases such as multi-site WordPress hosting, multiple websites with SSL, high availability fail-over setup for services, network appliances like load balancer, etc.
But there may be situations when the IP is not listed when users try to add it or the added IP address does not show up in the container.
Why adding secondary IP addresses to Proxmox LXC containers fails?
Adding additional IP addresses can fail if you do not have additional IP addresses available in the server at all. It could be possible that that IP address is not allotted to your server.
The IP address, if not bound correctly to the network interface, will not list in the Proxmox machine. In such cases, its important to check the IP routing and bind it to the proper interface.
Another reason why the IP addition fails is the wrong configuration or parameters chosen while adding the IP. Today we’ll see how to add a second IP address to Proxmox container.
How to add multiple IP addresses in Proxmox LXC container
It is possible to add multiple IPs to an LXC container from the Proxmox VE management interface.
1. Add extra IP address to the server
To add an IP, first make sure that extra IP address is available in the Proxmox machine.
2. Assign the additional IP address to the container
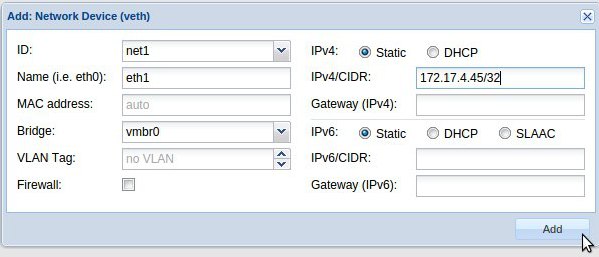
Once a free IP is available in the server, it can be added to the LXC container. Click on the container -> Network -> Add option to add a new network.
Enter the details such as ID, Name, IP address information as shown and ‘Add’ the IP address. The static IP we have added here is 172.17.4.45.

Add a second IP to the LXC container in Proxmox
On successfully adding the second IP address, it will be listed in the ‘Network’ tab of the LXC container:

Second IP listed for LXC container in Proxmox
3. Verify the functionality of the additional IP addresses
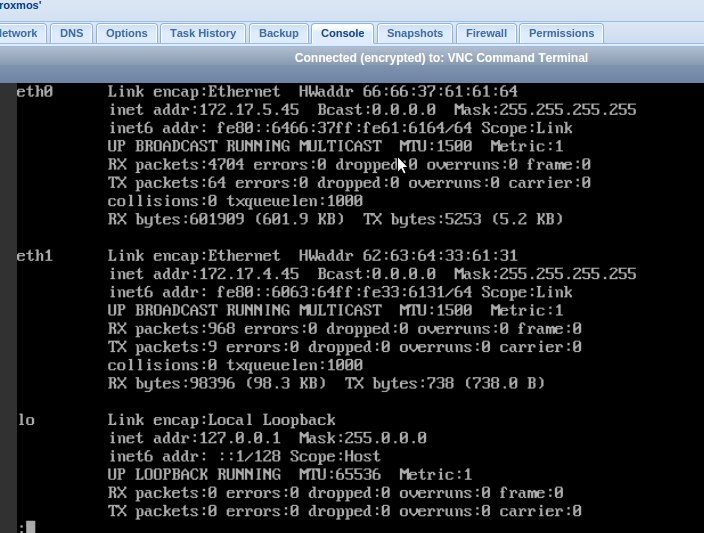
On accessing the LXC container via Console, you can see both the IP addresses listed in it using the command ‘ifconfig’.

Two IPs listed in the LXC container in Proxmox
Accessing the container via the new IP address can confirm it is working fine. This additional IP address can be allocated to the services such as web, mail, SSL, etc.
In short..
Today we’ve discussed how to add additional IP addresses to LXC containers in Proxmox. Though its a simple process, care should be exercised in adding IPs.
Assigning the IP to the correct interface is an important point. Here we saw how to add static IPv4 addresses. To add IPv6 address, a few more settings have to be done in the server.
There may be situations where the data center has not assigned the IP correctly or the system engineers have not configured it properly in the server.
In such cases, identifying the problem and making the additional IPs available, is important. If you’d like to know how to do it for your servers, we’d be happy to talk to you.


0 Comments