Options to scale up on a need basis make Cloud solutions like Amazon EC2 popular. Amazon EC2 allows to start with few servers and launch as many servers as you need.
But, for virtual servers to work properly, it requires proper configuration. And, network settings in Amazon EC2 instance often confuse users.
That’s why, we often get requests from customers to setup network in AWS instances as part of our Managed Cloud Services.
Today, we’ll see how our Dedicated Engineers setup Amazon EC2 NAT and fix common errors in it.
Why Amazon EC2 ?
Before proceeding further let’s see more details on Amazon EC2.
Amazon EC2 is a service that allows the creation of virtual servers using previously configured templates. Thus, it eliminates the need to invest in hardware up front. Also it helps to develop and deploy applications faster.
Additionally, it has built-in security features like security groups. We create instances and group them under a security group. It helps to specify the protocols, ports, and source IP ranges that can reach the private instances using security groups.
Why NAT?
Now, its time to see why we need Network Address Translation aka NAT.
Not all cloud servers need direct public internet access.
Isolating virtual servers from internet really helps to enhance security. And, Amazon EC2 NAT setup is a quick way for this.
Here, the public IP address is mapped to the primary private IP address of virtual server through network address translation (NAT).
Thus, it allow instances in a private subnet to connect to the internet or other AWS services. Also, NAT helps to prevent the EC2 instances from receiving inbound traffic initiated by someone on the Internet.
How to setup NAT in EC2
Now, we know the benefits of EC2 and NAT. Its time to see how our Support Engineers enable Amazon EC2 NAT for our cloud customers.
AWS provides multiple ways to provide internet access to instances. It can be set up using an internet gateway directly connected to the virtual server, or using routing table. Similarly, AmazonEC2 help to create NAT gateway or NAT instance for public internet access too. Another quick option would be to enable Elastic IP address feature too.
The exact choice depends largely on the customer requirement. For instance, one of our AWS customer wanted multiple servers to have internet access from the same source IP. Therefore, we suggested him the option to create NAT gateway. We’ll now see how exactly our Dedicated Engineers setup network access for a customer using NAT gateway.
Here, we began by assigning Internet Gateway to the Virtual Private Cloud aka VPC.
Then we setup NAT Gateway with Elastic IP in the chosen subnet. The next step was to configure the routing table used for instances with a default route (0.0.0.0/0) pointing to the NAT Gateway. Further, we set up the routing table used for NAT Gateway with a default route (0.0.0.0/0) pointing to the Internet Gateway. And, that routed all traffic from the server through the NAT gateway.
Finally, we completed the setup by ensuring that security groups allow outbound traffic over desired ports on instances.
The port forwarding rules will take care of the route that any data packet take from the server. A sample set of NAT port forwarding rules on one our server look as shown below.
[root@ip]# iptables -t nat -L
Chain PREROUTING (policy ACCEPT)
target     prot opt source               destination
DNAT       tcp  --  anywhere             anywhere             tcp dpt:13800 to:10.20.1.141:22
DNAT       tcp  --  anywhere             anywhere             tcp dpt:13801 to:10.20.1.142:22
DNAT       tcp  --  anywhere             anywhere             tcp dpt:13802 to:10.20.0.167:22

Chain INPUT (policy ACCEPT)
target     prot opt source               destination

Chain OUTPUT (policy ACCEPT)
target     prot opt source               destination

Chain POSTROUTING (policy ACCEPT)
target     prot opt source               destination
MASQUERADE  all  --  ip-xxx.compute.internal/16  anywhereCopy Code
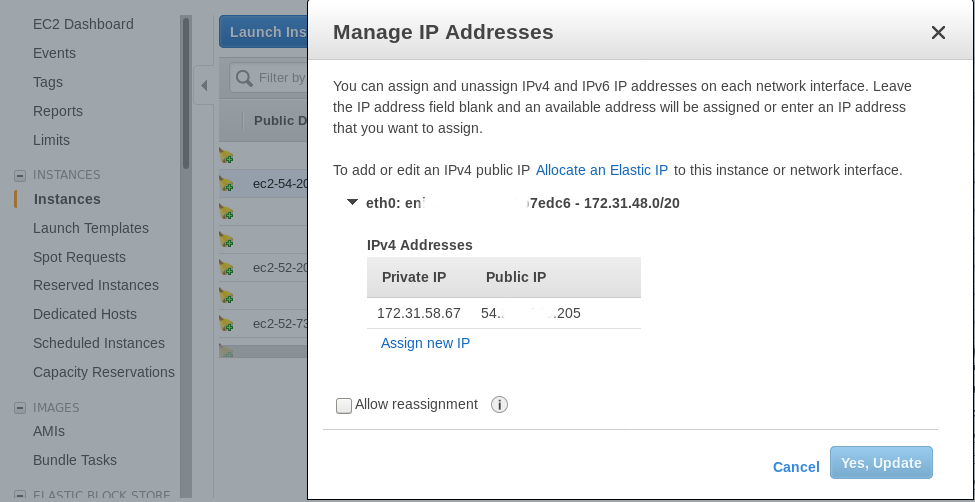
There are options to add IP address on the EC2 instance from the Amazon Dashboard too. It shows the exact mapping between the public and private address. The exact interface look as shown in the picture.

Here, the private IP address 172.31.58.67 has NAT setup to public IP 54.xx.xx.205.
Common errors with Amazon EC2 NAT
Now, its time to see the typical errors with Amazon EC2 NAT setup.
1.Intermittent connection problems
Unfortunately, connection problems often occur when using NAT instance. Here, the instances in a private VPC subnet can connect to the internet, but have intermittent connection issues. The typical reasons for the error include operating system-level connection limits, network timeouts or access control lists configured on the server.
Recently, when one our customer reported connection problems, the culprit was the operating system-level connection limits.
Here, we first checked the number of active NAT connections, using the netstat command:
netstat -ano | grep ESTABLISHED | wc –l
netstat -ano | grep TIME_WAIT | wc –l
Unfortunately, the connection limit was reaching on the vpc. To fix the problem, our Dedicated Engineers had to increase the operating system local port range by running this command:
net.ipv4.ip_local_port_range = 1025 61000
2. Failing updates in instances
Similarly, often updates in instances can fail due to wrong NAT settings. Here, the customer was trying to run “yum update” from the private instance. But he got the following error:
Cannot find a valid baseurl for repo: amzn-main/latestCopy Code
The customer was using a standard AMI instance as a NAT instance and hence it was failing while making private subnet instance outbound calls. It was a known security problem with standard AMI instance.
Therefore, to fix and make update running, we had to modify the iptables. Additionally, we setup IPv4 forwarding and disabled ICMP redirects too.
It’s even possible to use a Community amzn-ami-vpc-nat instance to workaround such problems.
[Finding problems with Amazon EC2 NAT setup? We can make it right.]
Conclusion
In a nut shell, Amazon EC2 NAT setup is one of the best ways to prevent the instances from receiving inbound traffic. Today, we saw the various methods to set up NAT, and how our Dedicated Engineers solve the top errors with it.


0 Comments