We configure DKIM on Exchange Server 2013, to reduce the number of common e-mails in the Spam folder in the recipient mailbox.
At Bobcares we assist our customers in regards to installations as part of our Server Management Services.
Today, let’s see the effective methods our Support Engineers employ.
Configure DKIM on Exchange Server 2013
To reduce the number of common e-mails that regularly got to the Spam folder in the recipient mailbox, we configure SPF in the domain. However, it was not enough for some of the mail servers. Thus, the idea to configure DKIM originated.

By default, MS Exchange Server does not support DKIM. The best way to implement DKIM signing is via a third-party plugin, a free transport agent Exchange DKIM Signer.
Exchange DKIM Signer is an open-source, easy to install DKIM Signing Agent for Microsoft Exchange Server. It includes support for Exchange Server 2007 through to 2016.
DKIM (DomainKeys Identified Mail) is an email security standard making sure messages are not altered in transit between the sending and recipient servers. It uses public-key cryptography to sign the email with a private key as it leaves a sending server.
Recipient servers can then use a public key published to a domain’s DNS to verify the source of the message, and that the body of the message has not changed during transit.
Once the hash made with the private key is verified with the public key by the recipient server, the message passes DKIM and is considered authentic.
If we have .NET Framework 4.5 installed, we can install the agent automatically. Otherwise, we will have to install and configure Exchange DKIM Signer manually.
-
Automatic Installation of Exchange DKIM Signer
- Back up Exchange server
- Download Configuration.DkimSigner.zip from https://github.com/Pro/dkim-exchange/releases/latest
- Then unzip it into any folder and run
Configuration.DkimSigner.exe - Now, click the Install option
- Here we can select the version to install
- Click Install and wait till the installation is complete
- Finally, close the window
Now let us configure the installation. Like in the case with the installation, we can do it either manually, or in the GUI.
-
Configuration of Exchange DKIM Signer
Click Configure and make sure that Exchange DKIM Signer has the lowest priority. It is necessary that the letters are signed at the last step after all modifications by other transport agents.

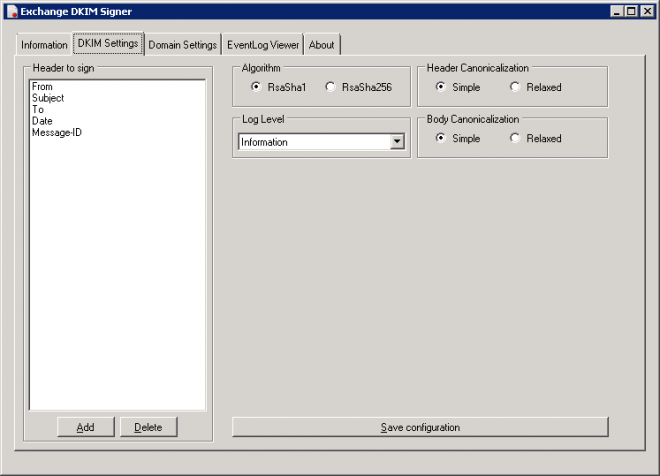
In the DKIM Settings tab, specify what fields will be signed. By default, these are From, Subject, To, Date, Message-ID

We can configure the domain in the Domain Settings tab. Then, Specify the name of the domain, the selector, and a file with the secret key. We can generate the key can right here.
openssl genrsa -out private.pem 1024
openssl rsa -pubout -in private.pem -out public.pem

After setting all parameters, click Save Domain. Restart Microsoft Exchange Transport.
Finally, we need to configure two DNS entries:
_domainkey.<your_domain_name>. TXT “t=s; o=~;”

mail._domainkey.<your_domain_name>. TXT “v=DKIM1; k=rsa; t=s; p=<public_key_contents>”
The o= parameter can take the following values:
- “~” — sign some e-mails from this domain
- “-” — sign all e-mails from this domain
“Mail” prior to “._domainkey” is the selector name.
Our Support Techs suggest to specify ADSP in DNS:
_adsp._domainkey.<domain_name>. TXT “dkim=all”
The DKIM parameter can take one of the following values:
- “unknown” — means there is no entry
- “all” — sign all e-mails
- “discardable” — unsigned e-mails must not receive
Send a text e-mail, say, to a Gmail mailbox, and look for dkim=pass in the headers:
In short, the strings are here, and it works well.
[Stuck with the configuration? We’d be happy to assist!]
Conclusion
To conclude, DKIM is an email security standard to make sure messages aren’t altered in transit between the sending and recipient servers. Today, we saw how our Support Tech Configure DKIM on Exchange Server 2013.


good write up. thank you!