Deploy Flask Apache on DigitalOcean without any trouble with this step-by-step guide by our in-house experts. Our DigitalOcean Support Services team specializes in solving issues and helping with queries.
How to deploy Flask Apache on DigitalOcean
Flask is used to develop web apps quickly. It is a micro-framework written in Python. Today, we are going to explore deploying Flask on Apache on DigitalOcean.
Step 1: Installation
- First, open the terminal and run the following command to install mod_wsgi.
sudo apt-get install libapache2-mod-wsgi python-dev - Then run this command to enable it:
sudo a2enmod wsgi
Step 2: Create a Flask App
- First, we have to create a Flask app.
- Then, move it to the /var/www directory.
- Next, create an application directory structure with mkdir command as seen below.

- Then create __init__.py file and add the following flask application logic:

- Finally, save and exit the file.
Step 3: Create a virtual environment for Flask app
- First install virtualenv and Flask via pip.
sudo pip install virtualenv - Then, activate the virtual environment with the following command to install Flask:
source venv/bin/activate - Then run the following command to install Flask inside:
sudo pip install Flask - Finally, test if the installation process is successful with this command:
sudo python __init__.py
Step 4: Configure and Enable a New Virtual Host
- First, run this command on the terminal:
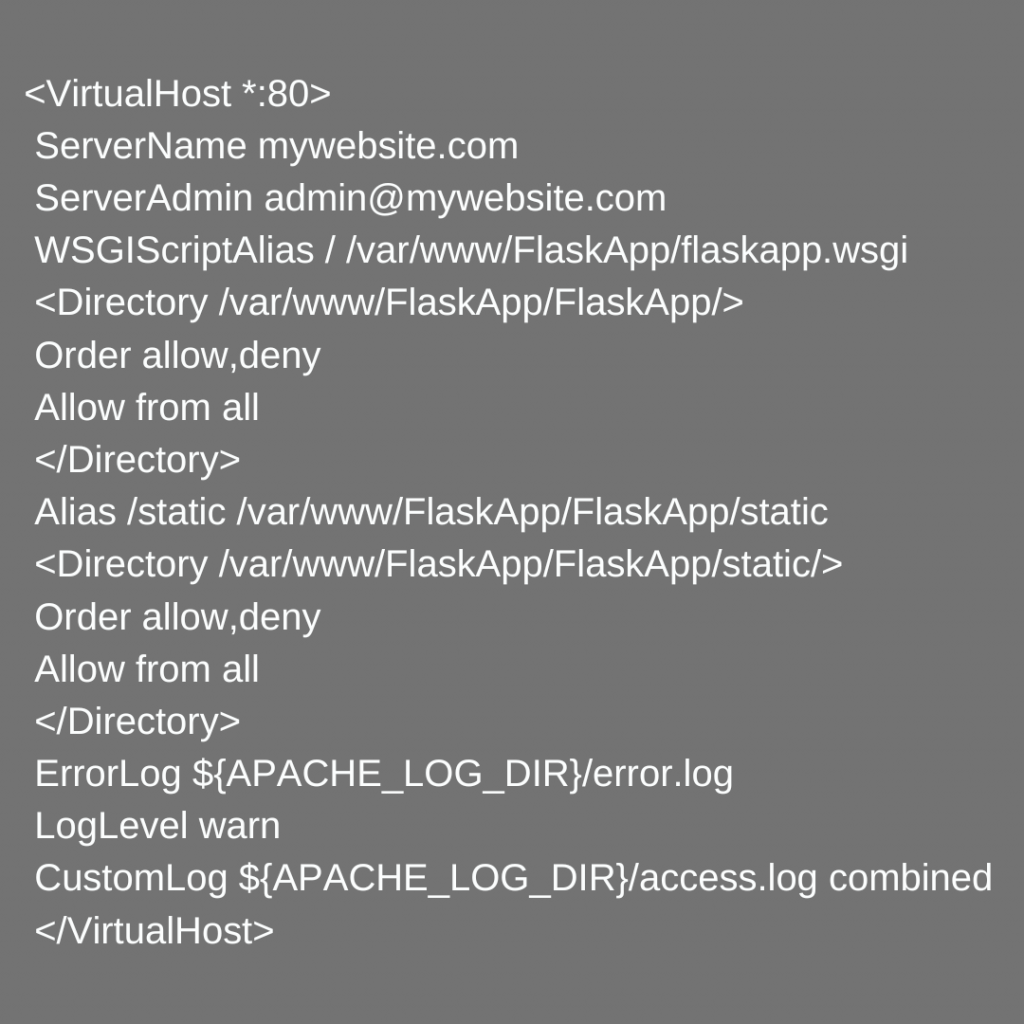
sudo nano /etc/apache2/sites-available/FlaskApp - Then add these lines to the file:

- Next, save and close the file.
- After that, enable the virtual host with this command:
sudo a2ensite FlaskApp
Step 5: Configure and Enable a New Virtual Host
- Now, we will head to the /var/www/FlaskApp directory.
- Then we have to create a file named flaskapp.wsgi and add the following lines:
#!/usr/bin/python

import sys

import logging

logging.basicConfig(stream=sys.stderr)

sys.path.insert(0,"/var/www/FlaskApp/") from FlaskApp import app as application application.secret_key = 'Add your secret key'
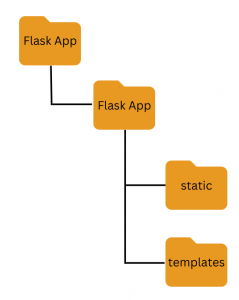
Now, the directory structure will look like this:

Step 6: Restart Apache
Finally, we have to restart Apache for the changes to take place.
Sometimes. We may come across the following message:
Could not reliably determine the VPS’s fully qualified domain name, using 127.0.0.1 for ServerName
This is a warning message and will not hinder access to the virtual host. Now, we can view the application by navigating to the IP address or domain name in a browser.
[Need assistance with a different issue? Our team is available 24/7.]
Conclusion
In conclusion, our in-house experts demonstrated how to deploy the Flask app on Apache in DigitalOcean. Let us know in the comments if you run into any trouble with the process.
PREVENT YOUR SERVER FROM CRASHING!
Never again lose customers to poor server speed! Let us help you.
Our server experts will monitor & maintain your server 24/7 so that it remains lightning fast and secure.


0 Comments