


Wondering how to install Webmin on Ubuntu 20.04? The Support Engineers at Bobcares are here with an informative tutorial.
With Bobcares by your side, you do not have to worry about Server Management any longer. Read on to find out more about the intricacies of installing Webmin on your server.
How to install Webmin on Ubuntu 20.04
Webmin is a modern web control panel designed to make it easier to manage a Linux server. The user interface is easy to use and allows you to configure DNS settings, manage user accounts, as well as change setting for common packages in a jiffy.
Today, the Support Engineers at Bobcares will take us through the installation and configuration of Webmin on the server. We will also learn how to secure access to the interface via a valid certificate.
Before we begin, we will require the following:
- Ubuntu 20.04 server with a configured UFW firewall and one non-root user with sudo privileges.
- Apache with a configured virtual host.
- Fully-Qualified Domains Name or FQDN that has a DNS A record pointing towards the server’s IP address.
Step 1: Installing Webmin on Ubuntu 20.04
First. We have to update the server’s package index with the following command:
sudo apt update
After that, we will add the Webmin repository. This allows us to install and update Webmin with the help of the package manager. We do this by opening the /etc/apt/sources.list file with the following command:
sudo nano /etc/apt/sources.list
Then we add the following line to the bottom of the file:
. . .
deb http://download.webmin.com/download/repository sarge contrib
Next, save the file and exit.
After this, we will add the Webmin PGP key. This allows the system to trust the new repository. This is done by installing the gnupg1 package.
Then, use wget to download the Webmin PGP key and add it to the system’s list of keys.
wget -q -O- http://www.webmin.com/jcameron-key.asc | sudo apt-key add
After that, we will update the list of packages once more to now include the trusted repository:
sudo apt update
Next, install Webmin with this command:
sudo apt install webmin
After the installation, you will see this output:
Output
. . .
Webmin install complete. You can now login to
https://your_server:10000 as root with your
root password, or as any user who can use sudo.
Step 2: Appending a valid certificate with Let’s Encrypt
Did you know that Webmin already uses a self-signed and untrusted certificate? We are going to replace that with a valid one from Let’s Encrypt.
First, use your web browser to navigate to https://your_domain:10000. Remember to replace your_domain with the domain name that points towards your Server IP address.
This will lead to a login screen, Log in with the non-root user credentials.
After logging in, you will come across the Webmin dashboard. We will set the server Hostname here. Navigate to the System hostname field and click the link as seen below:
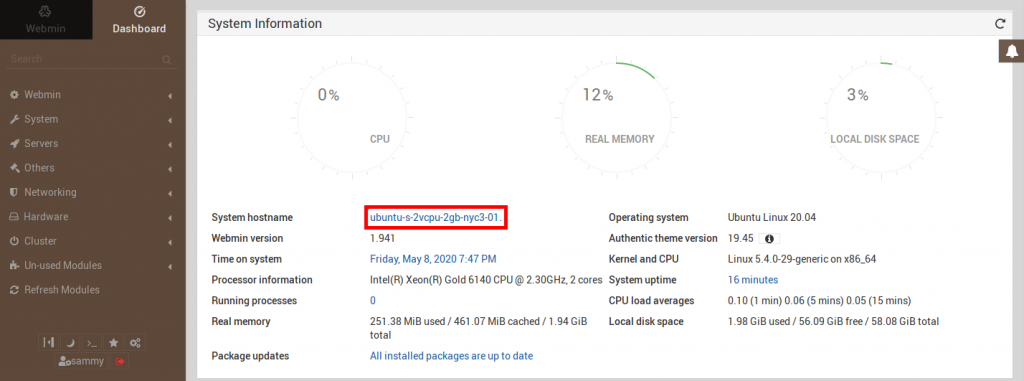
This takes you to the Hostname and DNS Client page. Then navigate to the Hostname option and enter the FQDN. Next, click Save.
After that, click the Webmin dropdown menu and navigate to Webmin Configuration.
Next, select SSL Encryption and click the Let’s Encrypt tab to get a screen as seen below:
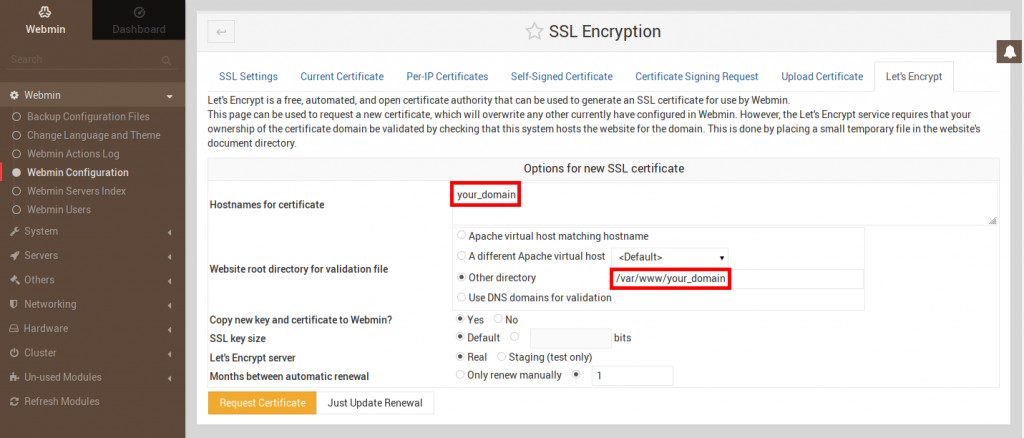
This page is used to obtain and renew the certificate. Although the Let’s Encrypt certificate expires after three months, you can configure Webmin to automatically renew the certificate every month. We will configure Webmin to keep the verification file required for the certificate renewal inside the /var/www/your_domain folder. This folder is used by the configured Apache webserver. Here are the steps to set up the certificate:
- Enter FQDN in Hostnames for certificate option.
- Choose the Other Directory option and enter the website’s document root for the Website root directory for validation file.
- Type 1 to deselect the Only renew manually option and then select the radio button on the left for Months between automatic renewal.
- Then, click the Request Certificate button to see the confirmation screen.
In order to use the new certificate, navigate to Return to Webmin configuration and then click Restart Webmin button. Log in after the page reloads after 30 seconds. The browser will indicate that the certificate is valid.
Step 3: Managing users and groups
First, select the System dropdown menu and click Users and Groups. This allows you to manage and add users and groups from here.
You can create a new user with the name deploy to host web applications. You can also set options for user’s shell, password expiry as well as whether or not they can have a home directory.
Click Create a new user and follow these instructions to create a new user:
- Enter deploy for Username option.
- Next, choose Automatic for the User ID.
- Then enter a descriptive name for Real Name.
- After that choose Automatic for Home Directory.
- Next, select /bin/bash for Shell.
- Then, choose Normal Password for Password and enter a password.
- After that, navigate to Primary Group and choose New group with same name as user.
- Choose sudo from All groups for the Secondary Group. If not automatically added to the In groups list, press the enter button to add it.
Once you finish making these selections, press Create.
Updating packages
Webmin allows you to update all the packages via the user interface. Our Support Engineers recommend clicking the Dashboard button and navigating to Package updates. In case there are available updates, you will notice a link with the number of available updates.
We will click this link and then press Update selected packages to initiate the update. You may have to reboot the server via the Webmin interface as a part of the updates.
[Need assistance with Server Management? Give us a call.]
Conclusion
In short, we learned how to install a secured working instance of Webmin. We also got to learn how to create a user and update packages through the Webmin user interface from the skilled Support Team at Bobcares.
PREVENT YOUR SERVER FROM CRASHING!
Never again lose customers to poor server speed! Let us help you.
Our server experts will monitor & maintain your server 24/7 so that it remains lightning fast and secure.


0 Comments