


Learn how to create and manage LXC containers in Proxmox for efficient virtualization. Our LXC/LXD Support team is ready to assist you.
Create and Manage LXC Containers in Proxmox
Linux Containers provide lightweight, isolated environments on a single host, offering fast performance with minimal overhead. Integrated with Proxmox, LXC enables easy deployment, management, and scaling of applications while ensuring strong isolation and efficient resource use.
Introduction to LXC
Linux Containers, or LXC, provide a lightweight way to virtualize applications and even entire systems. Instead of depending on a traditional hypervisor, they rely on the Linux kernel to create separate environments that run side by side on the same host. This approach reduces overhead, speeds up performance, and keeps resources available for more workloads.
As a result, LXC has become an important part of modern virtualization. It gives users the flexibility of running different Linux distributions on a single host while maintaining clear separation between applications. At the same time, it delivers the efficiency of bare-metal performance, which makes it a preferred choice for developers and system administrators who need both speed and control.
Key Features of LXC Containers
| Feature | Description |
| Lightweight and Fast | LXC containers use minimal resources compared to traditional virtual machines. They start and stop almost instantly, enabling faster deployment and testing. |
| Isolation | Each container runs in its own separate environment. Processes, networks, and filesystems remain independent, preventing conflicts and enhancing stability. |
| Flexibility | Users can customize resource limits, network configurations, and file system structures to meet specific application needs. |
| Security | Namespaces and control groups provide strong protection. Issues in one container do not affect the host or other containers. |
| Efficiency | Operating system-level virtualization combines the feel of a full Linux system with lightweight processes, ensuring stable performance across environments. |
| Portability | Containers carry their dependencies, making them consistent and portable across development, testing, and production environments. |
Understanding Proxmox Virtual Environment
Proxmox Virtual Environment provides an open-source solution for managing virtual machines and containers within a single platform. It combines full virtualization through KVM with container-based virtualization using LXC, allowing users to run a variety of workloads efficiently. Through its web-based interface, administrators can create and configure virtual machines and containers, allocate storage and network resources, and monitor performance without switching between tools.
The platform ensures continuous operation by supporting high availability, automatically moving workloads to other nodes if a failure occurs. It also integrates software-defined storage and networking, which allows flexible and scalable deployment of resources. Proxmox includes reliable backup and restore features to protect data, while live migration enables moving workloads between nodes without interruption, making maintenance seamless. Its open-source nature encourages transparency, adaptability, and access to a supportive community for guidance and development.
Why Use LXC Containers in Proxmox
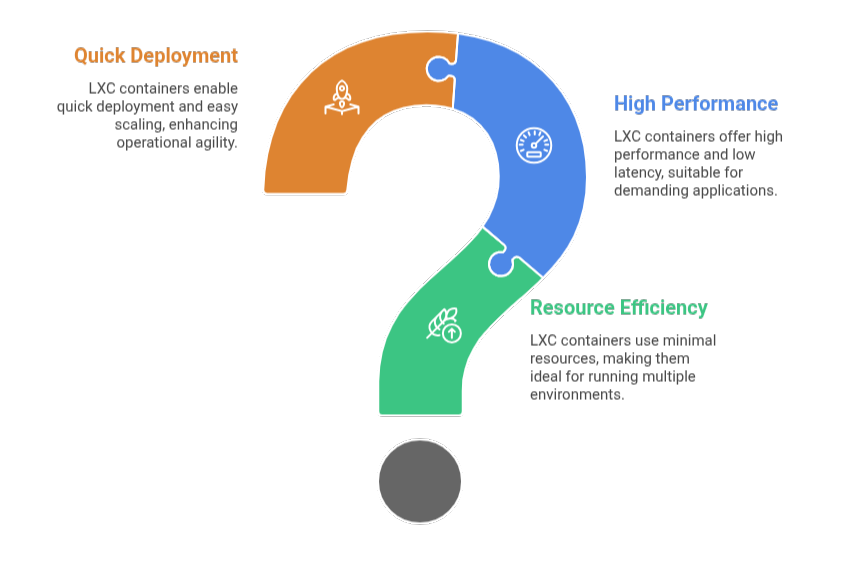
LXC containers in Proxmox provide a lightweight and efficient way to run multiple Linux environments with minimal resource usage and fast startup times. They isolate applications or development servers while delivering high performance, low latency, and reliable resource management. Ideal for hosting websites, deploying applications, or handling hardware-intensive workloads, LXC containers enable quick deployment, easy scaling, and stable operation through Proxmox’s management interface.
Creating an LXC Container in Proxmox
Deploying an LXC container in Proxmox is straightforward and can be done using the web interface or the command line.
Using the Web Interface:-
Log in to the Proxmox web interface and select your node. Choose a storage location and download a Linux distribution template. Click Create CT, provide a hostname and root password, select the template, and configure disk size, CPU cores, memory, swap, network settings, and DNS. Review the settings and finish the creation. Start the container and access its terminal through the Console.
Using the Command Line Interface:-
Connect to the Proxmox server via SSH. Download the desired template if not already available. Create the container using the pct create command with parameters for VMID, hostname, password, CPU, memory, swap, disk, network, and DNS. Start the container with pct start <VMID> and access it using pct enter <VMID>.
This method allows efficient deployment of LXC containers, providing isolated Linux environments for development, hosting, or other applications.
Managing LXC Containers on Proxmox
Managing LXC containers on Proxmox focuses on configuring resources, networking, storage, and access efficiently.
Resource Allocation:-
CPU cores, memory, and swap are set during container creation and can be adjusted later through the “Resources” tab. CPU limits help control maximum usage for stable performance.
Networking:-
Containers can use DHCP for automatic IPs or static IPs to fit specific network requirements. Network settings are configured during creation for smooth connectivity.
Storage:-
Disk space is allocated when creating the container, and storage can be resized afterward through the “Resources” tab for growing workloads.
Console and Remote Access:-
The Proxmox web interface provides direct console access using root credentials. For remote management, SSH access can be enabled by creating a user with sudo permissions inside the container.
This approach ensures efficient operation, flexible management, and secure access for LXC containers.
Snapshots, Backups, and Migrations
Ensuring the safety and mobility of LXC containers requires proper snapshots, backups, and migration strategies.
Snapshots:-
Snapshots capture the container’s current state, allowing quick restoration if issues occur. They are useful for testing changes or updates without risking the live environment.
Backups:-
Regular backups safeguard container data and configurations. Proxmox supports scheduled backups and integration with Proxmox Backup Server for advanced features like deduplication and encryption.
Migrations:-
Containers can be moved between Proxmox nodes without downtime using live migration. This allows maintenance, load balancing, or scaling across the cluster while keeping services available.
Backup Proxmox VMs with Vinchin:-
Ensure Proxmox VM data is safe and easily recoverable by using Vinchin Backup & Recovery. Add your Proxmox host, select the VMs, choose storage, and configure backup schedules and retention policies. Vinchin handles backups automatically, providing agentless operation, fast restores, and enterprise-grade data protection. This approach reduces downtime and keeps your virtual environment secure and manageable.
[Need assistance with a different issue? Our team is available 24/7.]
Conclusion
Proxmox makes it simple to deploy and monitor LXC containers efficiently. Following best practices ensures you can securely create and manage LXC containers in Proxmox for various workloads.
In brief, our Support Experts demonstrated how to fix the “554 5.7.1 : Relay access denied” error.


0 Comments