Let’s see the detailed steps for Ruby on Rails setup on a Droplet. At Bobcares, with our DigitalOcean Managed Service, we can handle your issues.
Overview
What is Ruby on Rails?
Ruby on Rails, or just Rails as it’s often known, is a Ruby programming language web application framework. It’s based on the Model-View-Controller (MVC) architectural paradigm and aims to simplify and optimise web development. The main features include:
1. Rails reduces the need for developers to provide setups by emphasising reasonable defaults and standards. Hence, this frees developers from having to worry as much about boilerplate setup and more about building app code.
2. Rails promotes the DRY principle—which advocates for minimising code duplication. Modular design and the utilisation of reusable parts help achieve this.
3. With its high-level, Ruby-like interface to the database, Active Record, an Object-Relational Mapping (ORM) framework included with Rails, streamlines database interactions. Database tables are a common source for Rails models.
4. Migrations is a technique that Rails offers to handle changes to database schema over time. Developers may change the database schema as the application develops thanks to migrations.
5. The REST concepts are ingrained in the architecture of Rails. It facilitates the creation and management of online services by promoting the usage of RESTful routes.
6. A component of Rails, Scaffolding allows automatic code creation for routine operations like adding, editing, as well as removing entries. For developers, this may be a jumping-off point, saving time and effort.
7. Because Ruby on Rails makes use of the RubyGems packaging system, developers may effortlessly integrate third-party libraries and plugins to increase the functionality of their apps.
Ruby on Rails-DigitalOcean Droplet Setup
Combining the strength of the Ruby programming language with the ease of use of DigitalOcean’s infrastructure, setting up a Ruby on Rails environment on a droplet is a simplified procedure. We can concentrate on creating reliable web apps rather than worrying about complicated settings thanks to this architecture, which guarantees a seamless and effective development and deployment process.
Whether we’re a seasoned developer or just starting, the Ruby on Rails DigitalOcean droplet setup offers a user-friendly experience to enhance web development endeavours.
Here, we automate Ruby on Rails deployment using DeployBot to make it visible, consistent, and reproducible for ourselves and our coworkers. We will use a fresh Ruby on Rails droplet from DigitalOcean to build up an automated deployment mechanism. We’ll need a DeployBot account in order to use our Rails deployment tools.
We may use our own connection details and omit the DigitalOcean steps if we are deploying to our own servers. Else, we can use a Ruby on Rails droplet from DigitalOcean if we don’t already have a server to deploy to.
Step 1: Deployment Environment Setup
After the DeployBot account has a server up and running, the set-up is rather simple. Let’s begin by setting up a fresh environment in Deploybot. Creating an environment allows us to arrange several servers into logical groupings. Production, Live, Staging, Testing, and Development are a few typical deployment environment options, but ultimately the choice is entirely ours. Since we will be using this environment to test the idea, we will call it Staging for the purposes of this example.
Step 2: DeployBot settings Modification for Ruby on Rails Deployment
After setting up the environment, we must install a minimum of one server. This server, which will act as the deployment target for Ruby on Rails, includes information on the host, login, and password in addition to what files need to be placed on the server and where among many other parameters may be required.
As we can see, DeployBot is compatible with a variety of target server flavours, including Amazon S3, Shell deployments, FTP/SFTP, and more. This time, we’ll concentrate on Atomic SFTP deployment, which is one of the most helpful deployment methods for Rails apps. All of them are worth investigating further if we want to create a really unique, customised deployment process in the future.
The architecture of atomic SFTP ensures that there is never any downtime when deploying. The deployments either undergo full execution or not at all and in the event that a deployment fails, the earlier code continues to function. Even if the deployment fails and a file is undeliverable, this won’t impact the app. Atomic SFTP installations use the SSH protocol because SSH is an extremely dependable and safe protocol, which is particularly helpful for SFTP installations.
Atomic SFTP server form: It’s entirely up to us what name we give the server at this point. It’s only a label for ease. People frequently merely utilise the server’s hostname.
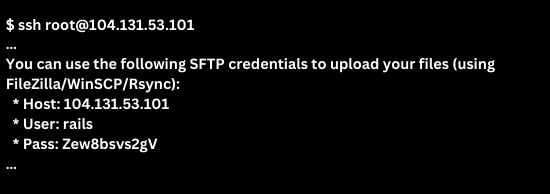
The host, port, and login credentials from the DigitalOcean droplet must now be entered. As soon as we use SSH to log into the droplet, we may obtain this particular information. In the terminal, it will print out as follows:

Make sure to disable the Deploybot’s “use public key authentication” option after copying that data into the server form.
The app path is what we need to provide next. This is the directory that the deployment will use to store all of the files and build the framework required to enable atomic deployments. Since we’ll be using
/home/rails/myweb1/currentWe are now approaching the part that is special to Rails. We have a number of choices to personalise the deployment scenario, as we can see in the server form. These include launching webhooks, gathering assets, running commands on the server, and more. We need to ensure a few things happen on the server before the Rails app can function. For example:
i. Ruby selection is correct (if using RVM).
ii. Database is configured, and all migrations are handled
iii. Every gem’s dependency is current.
iv. The assets are compiled (if needed).
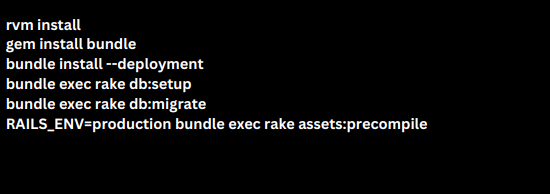
Upon uploading a new version, we must run the following instructions:

If we are using a task runner or post-processor other than Grunt, Gulp, or Rails’ asset pipeline functionality, we may add the instructions to generate the assets to the “Compile, compress, or minimise your code” section. This lets us run Sass, LESS, and other CSS or JavaScript transformers, among other commands, in any accessible Docker container to convert the source code. All we have to do is enter the Grunt or Gulp command there. The server will get all of the produced files.
We may now save the server in DeployBot, and everything should function properly assuming the server settings are accurate. If not, an error with a description will appear.
Step 3: Management of Configuration Files
We also have the option to save the configuration files including secrets in DeployBot and let us deploy them to the server, as we should never keep the secrets in source control. This enables us to exclude sensitive details from the repository. In the environment, we may add files from the Configuration files tab. After adding the file, we can modify the server configuration as well as set it up to a certain location.
We may need to make some adjustments to the droplet itself if we are using the standard Ruby on Rails DigitalOcean droplet. We must modify the root directive to this in the
/etc/nginx/sites-enabled/rails![]()
We’ll also need to change the
/etc/unicorn.conf![]()
Vim or Nano text editors allow us to perform both of these adjustments. After completing, make sure to run the following instructions:

We have completed the setup at this stage. Ruby on Rails is about to be deployed, and we won’t believe how seamless it will go. We’ll go to the environment page in DeployBot and click the Deploy button to start the first Ruby on Rails app deployment.
We can select the commit we want to deploy here, view the changes that will take place, see the commands that will be run, and write a comment to ourselves or our coworkers about the deployment of this Ruby app in the future. When we’re prepared, select “Deploy!” to initiate the action. A real-time log that details every step of the deployment process will be visible to us whenever we use DeployBot to deploy Rails apps.
Upon completion, the Rails deployment will be labelled as successful and the Ruby on Rails-DigitalOcean Droplet Setup is all set now.
[Want to learn more? Reach out to us if you have any further questions.]
Conclusion
Finally, the Ruby on Rails configuration on a DigitalOcean droplet provides a well-balanced combination of the expressive Ruby programming language and the intuitive DigitalOcean platform. Instead of being mired down by complex setup procedures, developers can concentrate on their app logic thanks to this simplified environment. Building, deploying, and scaling Ruby on Rails apps becomes a simple and effective operation with the ease of this deployment procedure, suiting both novice and seasoned developers.
We can also consider of using traffic shaping to enhance the functionality of the shared connection even further. One way to stop users from misusing bandwidth when downloading files is to utilise traffic shaping.
PREVENT YOUR SERVER FROM CRASHING!
Never again lose customers to poor server speed! Let us help you.
Our server experts will monitor & maintain your server 24/7 so that it remains lightning fast and secure.


0 Comments