


Sometimes backups become life savers of server owners.
Therefore, maintaining regular backups is really critical in case you need a restore.
At Bobcares, we help server owners in designing effective backup strategies. Also, we help customers to take backups and restore VM from backups as part of our Server Management Services.
Today, let’s see how we restore a Proxmox VM from backup.
Restore Proxmox VM from backup – Why it’s needed?
The data is always valuable. There are various reasons why backups become important in your business.
- To recover files that are accidentally deleted or corrupted.
- Hardware failures hard to recover.
- Server upgrades or migrations.
- Virus or malware can corrupt the files.
So, an updated backup is always necessary to recover from emergency situations.
Restore Proxmox VM from backup – How we backup the VM?
Firstly, let’s see how our Support Engineers backup the Proxmox VM. Creating backup of the Proxmox VM involves different steps.
1) Configure backup storage
Before performing the backup of the virtual machine, our Support Experts define the backup storage location. We usually enable the backup location using the below steps.
- Go to Datacenter > Storage.
- Select the backup storage location.
- Click on Edit tab.
- Make sure to select Backups/VZDump backup file under Content.
- Click OK.
Now, the storage medium is ready to store backups.
2) Stop the Proxmox VM
Our Support Engineers always recommend customers to shut down the virtual machine before performing backup operation. This ensures that the virtual machine is up to date and no operations occur in the mid of backup process.
3) Backup the Proxmox VM
Now, let’s see how our Dedicated Support Engineers run backup operation on a Proxmox VM. We can run backup from command line as well as from GUI.
To create the backup from command line, we login to the VM via SSH and run the following commands.
cd /var/lib/vz/dump
vzdump 501
This will create a backup of the VM 501 in the location /var/lib/vz/dump.
Alternatively, we follow the below steps to create a backup from the control panel.
- Select the VM to backup.
- Click Backup > Backup now.
- Select the storage destination, backup mode and compression.
- Finally, click Backup.
We always recommend customers to have a set of working backups, so that we can restore them in case of emergency. Our Support Engineers assist server owners to schedule the backups in Proxmox VM, so that they get execute automatically on specific days and time.
We usually schedule the backups from the GUI using the below steps.
- Go to Datacenter > Backup.
- Go to Add > Create Backup Job.
- Select the details such as node, destination storage, days of the week, time, etc.
- Ensure backup job is Enabled.
Restore Proxmox VM from backup – How we do it?
Now, let’s discuss how we restore the Proxmox VM from the backup. We usually restore the VM from command line as well as GUI. Let’s see both cases in detail.
Our Support Experts commonly use command line utility to restore the VM as it’s quite easy. For example, we use the qmrestore command to restore the KVM VM 501 from the backup.
qmrestore vzdump-qemu-019-2018_10_14-15_13_31.vma 501
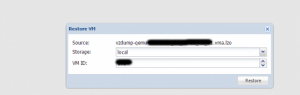
Similarly, to restore LXC container, we use the command pct restore. On the other hand, to restore the VM from GUI, we follow the below steps.
- Browse to the VM to be moved.
- Click on Backup.
- Select the backup file generated and click Restore
- In the restore field, specify where to restore the VM.
- Click Restore.
How to restore VM backup in Proxmox?
[Need an expert to restore Proxmox VM from backup? Our Support Experts can help you here.]
Conclusion
In short, maintaining regular backups of your VM is necessary for quick and easy data recovery. Today, we’ve discussed how our Dedicated Support Engineers restore Proxmox VM from backup.


0 Comments